

Cortex connects to many third-party vendors whose system interfaces frequently change. As a result, integration behavior or configuration steps may shift without notice. If you encounter unexpected issues, check with your system administrator or refer to the vendor’s documentation for the most current information. Additionally, integration sync times vary and are subject to scheduling overrides and timing variance.
Why use the integration for GitHub
GitHub is a Git-based source code management platform that helps teams share code, track changes over time, and collaborate on projects across an organization. Integrating GitHub with Cortex allows you to:- Automatically discover GitHub repositories and track ownership of the entities they represent in Cortex
- Manage your Cortex workspace through a GitOps workflow, using GitHub as the source of truth for entity definitions
- View repository context directly on an entity’s details page, including the associated repo, recent commits and releases in the event timeline, the most-used language, and top contributors with their contribution counts
- In an entity’s Code & Security section, surface vulnerabilities from GitHub Advanced Security, including code scanning, Dependabot alerts, CodeQL, and secret scanning
- Track pull requests and work items from the engineering homepage to keep delivery work visible alongside the rest of your catalog
- Use GitHub metrics in Eng Intelligence to understand service health, incident response patterns, and other key engineering signals
- Create Scorecards that drive alignment and measure progress on initiatives involving your repositories
- Track Copilot adoption and measure its impact on engineering productivity within Eng Intelligence
GitHub Copilot integrationIf you installed the GitHub app prior to October 14, 2025, you must accept new permissions in order to access Copilot metrics in Cortex.In your email, locate the message with subject line “[GitHub] Cortex App is requesting updated permissions” from
noreply@github.com and click the link to review and accept the change. As a security best practice, always verify that the email was sent from a trusted domain. In GitHub, click Accept new permissions.Alternately, you can remove your GitHub integration in Cortex and re-configure it. The GitHub app is preconfigured to include the permissions necessary for the Copilot integration.Configuring GitHub
Prerequisites
If you connect Cortex via a custom GitHub app, it must be configured with a fine-grained personal access token containing the minimum permissions listed below. Note that the Cortex GitHub app is preconfigured with these permissions.Repository permissions
Organization-level permissions
Enabling PR webhooks (optional but recommended)
Cortex ingests pull request (PR) data via the GitHub API. Subscribing to GitHub’s PR webhooks adds a real-time stream of PR events that Cortex cross-references against API data, which is the most efficient way to ensure every PR and event is captured without gaps. If you use the Cortex GitHub app, no action is required. The Cortex GitHub app receives these PR webhook events by default, so you get real-time PR data out of the box. If you use a custom GitHub app or a personal access token (PAT), you must subscribe to the following events manually at the repository or organization level:- Pull requests
- Pull request reviews
- Pull request review comments
- Pull request review threads
- Issue comments (GitHub delivers PR comments as issue-comment events)
- Organizations
- Repositories
Choosing a configuration option
There are multiple options for connecting Cortex to your GitHub instance:- Through Cortex’s official GitHub app
- This option is supported for use with a single organization in GitHub.
- Through a custom GitHub app
- By using Cortex’s official GitHub app or a custom GitHub app, users can tag entities with Git details and enable GitOps-style configuration of data in Cortex.
- Using a personal access token
- Using Cortex Axon Relay, a relay broker that allows you to securely connect your on-premises GitHub data.
If you’re using a self-hosted instance of GitHub, you’ll need to verify that your Cortex instance is able to reach the GitHub instance. Requests are routed through a static IP address.Contact support at help@cortex.io to receive details about our static IP. If you’re unable to directly allowlist our static IP, you can route requests through a secondary proxy in your network that has this IP allowlisted and have that proxy route traffic to your GitHub instance.
Cortex GitHub app
Cortex GitHub app
Configure GitHub with the Cortex GitHub appCortex’s official GitHub app is the easiest way to connect your GitHub instance. It is preconfigured with the permissions needed to use this integration. Note that it is not available for Cortex Server.To set up the app:
-
In Cortex, navigate to the GitHub settings page:
- Click Integrations from the main nav. Search for and select GitHub.
-
On the GitHub settings page, next to
cortex, click Install.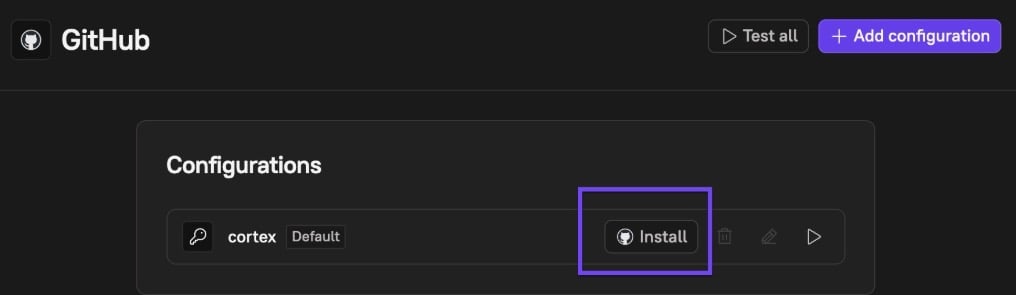
- Follow the prompts, then click Install & Authorize.
- Permissions for catalogs, Scorecards, and the Scaffolder.
- Webhooks to enable GitOps.
- Support for using GitHub teams as an ownership provider.
cortex.yaml file and checks Cortex-specific items. However, the linter DOES NOT validate data correctness. For example, the linter will confirm that the format of a group block is correct, but will not check that the group exists.Custom app
Custom app
Configure GitHub with a custom appIf you’re using Cortex Server, or if you don’t want to use the official Cortex app, you can connect a custom GitHub app.Make sure you have configured the permissions listed above under Prerequisites.Step 1: Register the custom app in GitHub
- Register the app. When you’re creating the app, make sure to follow these steps:
- Disable “Expire user authorization tokens.” (Cortex does not support this OAuth workflow yet.)
- Select “Request user authorization (OAuth) during installation.”
- Callback URL:
https://app.getcortexapp.com/github/redirect/{alias}- Make sure to use the GitHub configuration alias and not the tenant name in the URL.
- Webhook URL:
https://api.getcortexapp.com/api/internal/v1/github/webhook - Add a webhook secret of your choosing that will be identical to the webhook secret token configured later in Cortex settings.
- Set the repository and organization permissions outlined in the configuration modal.
- Check
PushandCheck suiteunder Subscribe to events.
- After the app has been created, generate a client secret and private key.
- In Cortex, navigate to the GitHub settings page:
- Click Integrations from the main nav. Search for and select GitHub.
- Click Add configuration, then for the type, select GitHub app.
- Fill in the form:
- Alias: Enter the name Cortex will associate with a given configuration.
- Application ID: Enter the ID for your custom GitHub ap.
- Client ID: Enter the unique client ID assigned to your app during registration.
- Client secret: Enter the unique client secret assigned to your app during registration.
- Private key: Enter the private key to authenticate with your GitHub app.
- Public link: Enter the public URL of your GitHub app.
- API endpoint (for GitHub enterprise): Enter the endpoint root URL for self-managed GitHub setups.
- Click Save.
- On the GitHub Settings page in Cortex, under Webhook, choose your new configuration alias and enter the same Secret token that was entered in GitHub during the app configuration.
- On the GitHub Settings page in Cortex, next to your custom app configuration’s name, click Install.
Personal access token
Personal access token
Configure GitHub with a personal access tokenPrerequisitesBefore getting started, make sure your personal access token has, at minimum, the
repo and read:org permissions.Note: Beyond the minimum permissions indicated above, many scenarios will require that the user who generated the personal access token have organization ownership permissions within GitHub.Configuration-
In Cortex, navigate to the GitHub settings page:
- Click Integrations from the main nav. Search for and select GitHub.
- Click Add configuration.
-
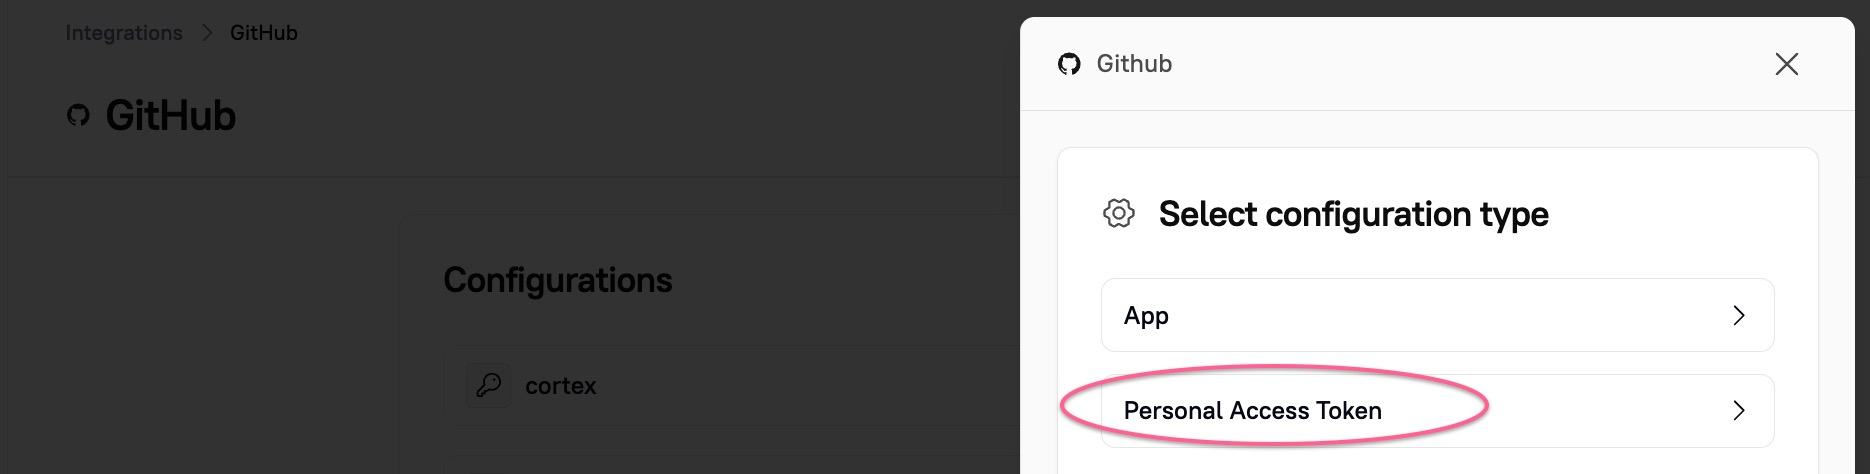
In the upper right corner of the modal, click the dropdown and select Personal access token.
-
Fill in the form:
- Alias: Enter a name that Cortex will associate with a given configuration.
- Token: Enter the Personal access token generated in GitHub.
- API endpoint (for GitHub enterprise): Enter the endpoint root URL for self-managed GitHub setups.
- Click Save.
Axon Relay
Axon Relay
Configure GitHub with Cortex Axon RelaySee Internally hosted integrations for instructions. Make sure to follow the GitHub-specific instructions for the docker-compose.yml file.
Configuring the integration for multiple GitHub accounts
The GitHub integration has multi-account support. You can add a configuration for each additional organization, instance, or account by repeating the process above. Each configuration requires an alias, which Cortex uses to correlate the designated organization, instance, or account with registrations for various entities. Registrations can also use a default configuration without a listed alias. You can edit aliases and default configurations from the GitHub page in your Cortex settings. To set the default configuration:- From the main sidebar, select Integrations.
- Locate GitHub, then click Settings.
- Locate the configuration, then click the pencil icon.
- From the Category drop-down menu, select a category. You must select at least one category before you can set the configuration as default.
- Toggle on Set as default. > Tip: If you only have one configuration, it’s automatically set as the default.
To write rules related to Dependabot alerts, you must verify the necessary permissions are set for repositories you’d like to see vulnerabilities reported on.To verify, navigate to a GitHub repo and click Settings > Code security and analysis. Ensure you are a member of a team under Access to alerts.
Registration
See the Create services documentation for instructions on importing entities.Entity descriptor
Repository You can define a GitHub repository for a given entity by adding thex-cortex-git block to the entity’s descriptor. When you define a repository, Cortex checks for Security Advisory vulnerabilities from the GraphQL API and Advanced Security vulnerabilities from the Rest API.
Only one repository can be defined for in a given entity’s YAML in the
x-cortex-git block. Users looking to list additional repositories without the full functionality of GitOps can define the repos as custom data.
Syncing ownership from GitHub
You can define the following block in your Cortex entity descriptor to add your GitHub teams as owners. Be sure to include both your GitHub organization name and the team name in thename field.
Cortex syncs GitHub teams and their members every day at 9 a.m. UTC. Cortex connects team members to their Cortex users through identity mappings.
To compare ownership sources, see the Ownership sources reference.
Identity mappings
Cortex maps users’ email addresses to discovered GitHub accounts, so you never need to define email ownership in an entity descriptor. Users must be members of GitHub teams to be pulled in to Cortex. You can confirm users’ GitHub accounts are connected from GitHub identity mappings in settings.Using the GitHub integration
View GitHub data on entity pages in Cortex
The GitHub integration will populate the Repo and Language detail blocks on an entity’s details page. If a GitHub team has been defined as the owner for an entity, it will also appear in the Owners block.Code & security
Vulnerabilities appear in the Vulnerabilities block under Code & security on an entity page overview. Click Code & security in an entity’s sidebar to view the full list of vulnerabilities for an entity. Cortex checks for:- Security Advisory vulnerabilities from the GraphQL API
- GitHub Advanced Security vulnerabilities
- Cortex pulls data from code scanning, Dependabot alerts, CodeQL, and Secret scanning.
- Dependency reviews are not supported.
You can query for vulnerabilities with CQL and create Scorecard rules based on security metrics. See Scorecards and CQL below.
Events
Recent commits appear at the top of an entity’s overview page. You can also click Events in the entity’s sidebar to see all commits and releases associated with that entity. Each is hyperlinked to the commit or release page in GitHub and includes a timestamp.Repository
You can access more detailed information pulled from GitHub in the Repository page in the sidebar. At the top of the page, you’ll find the repo(s) associated with that entity and the most-used language in files for that entity. In the Top contributors block, you’ll find the three users who have contributed the most code and the number of their contributions. In the Commits section, you’ll find the 10 most recent commits and metadata about each. Below Commits is the Recent releases section, which includes the 5 most recent releases.Issue tracking
From the Issue tracking page in the entity’s sidebar, you can find a list of open GitHub issues. Each issue will show the number, title, assignees, and date created.Packages
Packages are automatically scraped from your Git repos or they can be submitted via the packages API. The package file must be in the root of your repository — or, if you’re usingbasepath, in the root of the subdirectory — to be scraped by Cortex. You can query an entity’s packages in CQL explorer using packages().
To view packages, click Packages in the entity’s sidebar.
The following package types are automatically scraped from repositories:
- JavaScript / Node.js:
package.json,package-lock.json,yarn.lock,pnpm-lock.yaml - Python:
requirements.txt,pipfile.lock - .NET (C#):
packages.lock.json - Java:
pom.xml - Go:
go.sum
CI/CD - GitHub workflows
From the CI/CD > GitHub workflows page in the entity’s sidebar, you can find a history of GitHub workflow runs for the past week. Each run is tagged with its status:IN_PROGRESS, COMPLETED, SUCCESS, CANCELLED, FAILURE, PAUSED.
The GitHub workflows page displays data about workflows in GitHub, not Workflows initiated via Cortex’s Workflows tool.
Team entity pages
When a GitHub team is registered with a team entity, Cortex will pull GitHub users in to the Members tab. When available, Cortex will pull in the profile picture and email address for each user.Engineering homepage
The GitHub integration enables Cortex to pull information about pull requests and issues into the homepage. You can find your open pull requests, any pull requests assigned to you for review, and any issues assigned to you. Pull requests and issues from GitHub are refreshed every 2 minutes.Eng Intelligence
The Eng Intelligence tool uses pull request data from GitHub to generate metrics:- Average PR open to close time
- Avg time to first review
- Avg time to approval
- PRs opened
- Weekly PRs merged
- Avg PRs reviewed/week
- Avg commits per PR
- Ave lines of code changed per PR
Bot-authored pull requests and reviews
Some pull requests and reviews in GitHub come from bot accounts, like Dependabot or a GitHub App that a team set up. Cortex ingests this activity along with everything else and attributes it to the bot that produced it, so you can include or exclude it deliberately. How Cortex identifies a bot Cortex uses the account type that GitHub reports. If GitHub identifies the account as a bot, Cortex marks its pull requests and reviews as bot generated. Automation that runs under a regular GitHub user account isn’t marked as bot generated, because GitHub reports that account as a user. Where bot accounts appear- A pull request opened by a bot shows that bot’s account name as the author, for example
dependabot[bot], rather than an empty author. - In Eng Intelligence, bot accounts appear alongside people in the User filter and group-by options, so you can single out or exclude a specific bot.
- Eng Intelligence metric values don’t change. These pull requests were always counted, so all that’s new is the author attribution.
git.pullRequests() and git.reviews() return bot activity by default. GitPullRequest and GitReview each have an isBotGenerated field, which is true when GitHub reports the account as a bot. For more information about writing queries, refer to Cortex Query Language (CQL).
To count only the pull requests opened by people:
isBotGenerated set to false, even when a bot produced them, so a query with a long lookback period can undercount bot activity.
Scorecards and CQL
With the GitHub integration, you can create Scorecard rules and write CQL queries based on GitHub data. See more examples in the CQL Explorer in Cortex.Approvals required to merge
Approvals required to merge
Number of approvals required to merge a pull/merge request into a repository. Defaults to 0 if no approvals are defined.Definition: By having a rigorous PR process in place for a repo, you can make sure changes aren’t made that create vulnerabilities. This kind of rule could also be used in a best practices or project standards Scorecard.You can also use a similar expression in the Query Builder to find entities lacking approval:
git.numOfRequiredApprovals()ExamplesFor a security or development maturity Scorecard, you can write a rule to make sure at least one approval is required to merge a pull/merge request:Git repository set
Git repository set
Check if an entity has a registered Git repository.Definition:
git (==/!=) null: BooleanExampleIn a Scorecard, you can write a rule that detects whether an entity has a Git repository set:Branches
Branches
List all live branches with some basic metadata.
- Head
- Is protected
- Name
git.branches()ExampleFor a best practices Scorecard, you can make sure that branches associated with an entity match a standard naming convention:Branch protection details
Branch protection details
git.branchProtection() now returns the effective branch protection for a branch by merging policies from both classic branch protection and GitHub rulesets into a unified view. This means it reflects what GitHub actually enforces, regardless of whether a repo uses classic rules, rulesets, or a combination of both.- Branch name
- Code owner reviews required
- Dismiss stale reviews
- Required status checks
- Restrictions apply to admin
- Review required
git.branchProtection()ExamplesFor a security Scorecard, you can write a rule to make sure the default branch is protected:Branch rulesets
Branch rulesets
GitHub branch rulesets are a newer, more flexible alternative to classic branch protection. Rulesets are layered (organization + repository), composed of typed rules, and can target multiple branches by pattern. Cortex exposes them in CQL through
git.branchRulesets(...).git.branchRulesets(branchName?) returns the effective ruleset for a branch, i.e. the rules from every active ruleset that targets that branch, merged together. Pass a branch name to target a specific branch; omit it to use the repo’s default branch. Returns null if no ruleset applies.GitBranchRulesets fieldsGitBranchRule common fieldsPresent on every rule regardless of type .All remaining fields below are nullable; only the fields associated with a rule’s
type are populated, and the rest are null.Rule type: pull_requestRule type:
required_status_checksRule type:
required_deploymentsRule type:
updateRule type:
merge_queuePattern rule typesShared by
commit_message_pattern, commit_author_email_pattern, committer_email_pattern, branch_name_pattern, tag_name_pattern. The same four fields are populated for any of these.Rule type:
workflowsRule type:
code_scanningRule type:
copilot_code_reviewRule type:
file_path_restrictionRule type:
max_file_path_lengthRule type:
file_extension_restrictionRule type:
max_file_sizeRule types without parameters
creation, deletion, required_linear_history, non_fast_forward, and required_signatures present in the rules list with only the common fields populated.Nested typesRequiredReviewerConfiguration - each element of pull_request.requiredReviewers:RulesetReviewer - nested in RequiredReviewerConfiguration.reviewer:WorkflowFileReference - each element of workflows.requiredWorkflows:CodeScanningTool - each element of code_scanning.codeScanningTools:Relationship with
git.branchProtection()git.branchProtection() returns the effective branch protection for a branch, merging policies from both classic branch protection and GitHub rulesets into a unified result. git.branchRulesets() remains available if you need granular access to individual ruleset rules (e.g. filtering by type, source, or ruleset ID).Commits
Commits
Get the latest commits (to a maximum of 100) for a defined lookback period (defaulting to 7 days).Entities passing this rule will include those that haven’t needed three or more security fixes. This can indicate that there aren’t vulnerabilities in a given entity’s code, but could also suggest that fixes aren’t being implemented. Using this rule in conjunction with one focused on vulnerabilities could provide the extra context needed to gain a better understanding of what’s happening.
- Date
- Message
- SHA
- URL
- Username
git.commits()ExampleYou can use the git.commits() expression in a security Scorecard to make sure entities have fewer than three commits to a “security-fixes” branch in the last week:Default branch
Default branch
Default branch for the repository, or
main when null.Definition: git.defaultBranch()ExampleIf default branches should always be named “main,” you can write a rule to make sure entities follow this practice:File contents
File contents
Load the contents of a file from the entity’s associated repository.The contents can be validated by using string comparison operations or parsed by the built-in jq function. The jq function will automatically coerce file contents of JSON or YAML formats.Definition: A best practices Scorecard, meanwhile, could use this expression for a number of rules:
git.fileContents()ExampleFor a Scorecard focused on development maturity, you could use the git.fileContents() rule to enforce that a CI pipeline exists, and that there is a testing step defined in the pipeline.-
To make sure node engine version in specified in the
package.jsonfile: -
To make sure TypeScript projects have a
tsconfig.jsonfile checked in: -
To make sure projects using yarn do not allow NPM:
-
And to ensure the yarn version being used is not deprecated:
File exists
File exists
Check if file exists from within the entity’s associated repository.Definition: This rule would make sense in the first level because it’s so essential.A higher-level rule in a best practices Scorecard might confirm that developers are checking in lockfiles to ensure consistency in package installs:And/or a rule that makes sure there are unit tests enabled:Finally, you could write a rule to make sure projects have a standard linter:
git.fileExists()ExamplesFor a Scorecard focused on best practices, you can make sure that repositories contain a README.md file:Number of Git vulnerabilities
Number of Git vulnerabilities
Check the number of vulnerabilities for an entity’s associated repository.You can filter by severity (by default searches by all severities) or source (by default only searches GitHub security advisories).When using the GitHub Advanced Security source, severities displayed in the UI may not match severities returned by the API.Definition: You can use Scorecard levels to stratify vulnerabilities by risk. An initial level might make sure there are no critical vulnerabilities:While a higher level might make sure there are no vulnerability warnings:
git.numOfVulnerabilities()ExamplesA security-focused Scorecard will likely include a rule making sure there are no Git vulnerabilities:List of Git vulnerabilities
List of Git vulnerabilities
Lists the vulnerabilities for an entity’s associated repository. You can filter by severity (by default searches by all severities) or source (by default only searches GitHub security advisories). Note when using the GitHub Advanced Security source, severities displayed in the UI may not match severities returned by the API.Definition: You could write a rule that verifies the entity has no vulnerabilities with “High” or “Critical” severity sourced from GitHub Advanced Security:
git.vulnerabilities()ExamplesYou could write a Scorecard rule that verifies an entity has fewer than 5 Git vulnerabilities:Has Cortex YAML
Has Cortex YAML
Check if a repository has a valid
cortex.yaml file checked in at the root directory (when GitOps is enabled).Definition: git.hasCortexYaml()ExampleIf you’re using a Scorecard to track a migration from Cortex UI to GitOps, you can use this rule to make sure entities are set up for GitOps management of entity descriptors:Last commit details
Last commit details
Provides last commit details.As counterintuitive as it may seem, services that are committed too infrequently are actually at more risk. People who are familiar with the service may leave a team, institutional knowledge accumulates, and from a technical standpoint, the service may be running outdated versions of your platform tooling.Depending on best practices at your organization, you may want to confirm entities are updated within a week:Confirming whether a service was updated within the last week can help team members catch outdated code sooner. Plus, if there is a security issue, you can quickly determine which services have or have not been updated to patch the vulnerability.
- Date
- Message
- SHA
- URL
- Username
git.lastCommit()ExamplesOne of the first rules you might write for a Scorecard focused on development maturity or security is one validating that the last commit was within the last month:Pull requests
Pull requests
Lists the pull requests opened during a defined lookback period. Bot-authored pull requests are included by default, so filter them out if you only want activity from people.Each pull request has these properties:This surfaces entities that nobody has touched lately, which is useful when you need to confirm that a fix, like a vulnerability patch, is actually being picked up.ExampleFilter out drafts to count only the pull requests that are ready for review:ExampleFilter out bot accounts to count only the pull requests opened by people:Reverse the filter to
Definition -
git.pullRequests(lookback: Duration)ExampleUse the git.pullRequests() expression to find entities with very few pull requests opened in the last two weeks:pr.isBotGenerated to look at automated activity on its own, for example to see how much of a repository’s pull request volume comes from dependency bots.Reviews
Reviews
Lists the reviews left during a defined lookback period. Reviews left by bots are included by default, so filter them out if you only want reviews from people.Each review has these properties:This rule makes sure that more than 25 reviews were left in the last week.ExampleBecause bot reviews count toward that total, filter them out to hold the threshold to reviews left by people:Reverse the filter to
Definition -
git.reviews(lookback: Duration)ExampleA development maturity Scorecard might use the git.reviews() expression to make sure that a rigorous review process is in place before changes are implemented:review.isBotGenerated to measure automated review activity on its own.Workflow runs
Workflow runs
Get workflow runs meeting given filter criteria, including conclusions, statuses, and a lookback period.This rule is checking for GitHub workflow runs with a
- Conclusion
- Name
- Run started at
- Run time
- Run updated at
- Status
FAILURE, SUCCESS, TIMED_OUTStatuses: QUEUED, IN_PROGRESS, COMPLETEDThe lookback period specifies a duration for which returned runs should be created within, defaulting to a period of 3 days.- The
runTimeof theWorkflowRunobject represents the difference betweenrunStartedAtandrunUpdatedAttimes in seconds.
git.workflowRuns()ExampleTo make sure an entity has had a successful workflow run within the last two weeks, you can write a rule like:SUCCESS conclusion and COMPLETED status during a 14-day lookback window.To find the percentage of successes in workflow runs, you could write a query similar to:All ownership details
All ownership details
A special built-in type that supports a null check or a count check, used to enforce ownership of entities.Definition:
ownership: Ownership | NullExampleAn initial level in a security Scorecard might include a rule to ensure an entity has at least one team as an owner:All owner details
All owner details
List of owners, including team members and individual users, for each entityDefinition:
ownership.allOwners()ExampleThe Scorecard might include a rule to ensure that entity owners all have an email set:Team details
Team details
List of teams for each entityDefinition:
ownership.teams(): List<Team>ExampleThe Scorecard might include a rule to ensure that an entity owners all have a description and are not archived:AI adoption
AI adoption
The ratio of licensed seats that were active users of AI coding tools in a given time period. Returns a value between 0 and 1, where 1 represents 100% adoption. Note: This metric is only available for Team entities.Definition:
aiTools.analysis(lookback: Duration).aiAdoptionRateExampleYou could create a Scorecard rule to make sure AI adoption rate is at least 50% over the previous 30 days:Active AI users
Active AI users
The number of users who used AI coding tools in a given time period. Note: This metric is only available for Team entities.Definition:
aiTools.analysis(lookback: Duration).activeAiUsersExampleYou could create a Scorecard rule to verify you had at least 5 active AI users in the last 7 days:git(repoIdentifier: Text) command (e.g. git("github:org/repositoryName")).
This can be combined with other CQL rules. For example, a rule based on a dynamic external repository with custom data would be git("github:" + custom("my-custom-repo")).fileExists("README.md").
View integration logs
This feature is available in Cortex cloud.

Background sync
Cortex syncs GitHub identities (teams and people) once a day, at 9 a.m. UTC. Repository and pull request syncs start within 10 minutes of the previous sync’s completion. In most cases, this means Cortex’s GitHub data is no more than 10 minutes old, though a sync that takes longer than usual can push that slightly further out.FAQs and troubleshooting
I’m getting this error:"{"message":"Not Found", "documentation_url":"https://docs.github.com/rest/repos#get-a-repository"}".
If you’ve set up multiple GitHub accounts/organizations, Cortex will not be able to identify the correct one unless the alias variable is defined.
What if I have multiple email addresses set in my GitHub account?
Cortex will only detect the primary email address associated with your GitHub account if it is public.
If Cortex is not correctly pulling in user emails, ensure the given user(s) have allowed their email address to be public. Make sure the “Keep my email address private” setting is unchecked in the user’s personal GitHub settings.
My ownership isn’t being automatically mapped through GitHub.
If the email address associated with your Cortex account is not the same as your GitHub email address, you need to add your Cortex email address to the Public email dropdown in GitHub settings.
Github OAuth, which you can configure in Cortex user settings, allows you to link your GitHub username with your Cortex account, even if you don’t have a public email set up on GitHub.
Still need help?
The following options are available to get assistance from the Cortex Customer Engineering team:- Email: help@cortex.io, or open a support ticket in the in app Resource Center
- Slack: Users with a connected Slack channel will have a workflow added to their account. From here, you can either @CortexTechnicalSupport or add a
:ticket:reaction to a question in Slack, and the team will respond directly.