Using a Workflow to sync in ArgoCD
After integrating Cortex with ArgoCD, you can use Workflows to streamline and automate daily tasks. Rather than manually performing a sync through the ArgoCD UI, you can automate syncs by leveraging the ArgoCD API in a workflow.
This guide walks through a Workflow that will sync the ArgoCD application to the same cluster that ArgoCD is running, but to a different namespace, and will allow the user to choose options for the sync.
How to automate an ArgoCD sync with a Workflow in Cortex
Prerequisites
Before getting started:
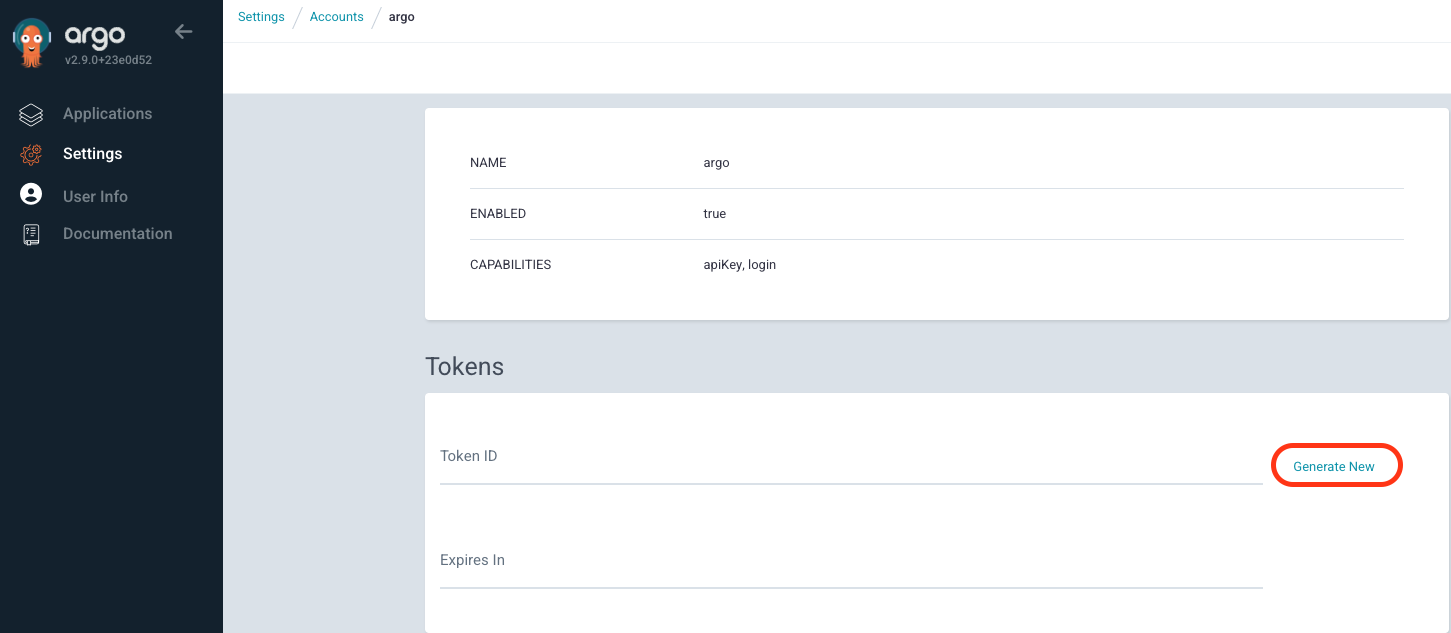
- Create an API token in ArgoCD.
- In ArgoCD, navigate to your account settings then click Tokens > Generate New. Copy the token and store it in a secure location, as you will need it in the next steps.
- In ArgoCD, navigate to your account settings then click Tokens > Generate New. Copy the token and store it in a secure location, as you will need it in the next steps.
- Create a secret in Cortex.
- Give the secret the name
argocd. - For the secret value, enter the value of your ArgoCD API token.
- Give the secret the name
Step 1: Create a Workflow
- In the main nav of Cortex, click Workflows.
- Follow the steps of the Workflows documentation to start creating a Workflow from scratch and configure its settings.
- Give the Workflow a descriptive name such as "Create and sync application."
- In the Response template field you can pass a blank response body or use Mustache templating to create messages depending on what the user enters in each field.
- For example, you may want to configure a response to confirm whether a sync was successful when the workflow is run. You could add the following to check the
sync.statusfield. This example assumes you add an HTTP request action with the slughttp-requestin your Workflow:
{{#actions.http-request.outputs.body.status.sync.status}}
Successfully synced application!
{{/actions.http-request.outputs.body.status.sync.status}}
{{^actions.http-request.outputs.body.status.sync.status}}
Unable to sync application. Are you sure this application exists in ArgoCD?
{{/actions.http-request.outputs.body.status.sync.status}} - For example, you may want to configure a response to confirm whether a sync was successful when the workflow is run. You could add the following to check the
Step 2: Add actions to the Workflow
In your Workflow, you will add an HTTP request action to call the ArgoCD sync via the ArgoCD API, and a user input action where you define inputs that map to the JSON body of the action. The inputs should be the same sync options shown under Sync in your ArgoCD instance. The instructions below map REVISION, DRY RUN, and PRUNE as the sync options.
- In the Workflow, click + to add an action. Select User input. Configure the action:
- Action name: Enter a name for the action (e.g.,
User input). - Slug: The slug field is automatically populated based on the action name.
- Under "User input fields," click Add input. Configure the input:
- Type: Select
Text. - Name: Enter
Revision. - Placeholder: Enter
HEAD. - At the bottom of the modal, click Add input field.
- Type: Select
- Under "User input fields," click Add input. Configure another input:
- Type: Select
Toggle. - Name: Enter
Dry run. - At the bottom of the modal, click Add input field.
- Type: Select
- Under "User input fields," click Add input. Configure another input:
- Type: Select
Toggle. - Name: Enter
Prune. - At the bottom of the modal, click Add input field.
- Type: Select
- Action name: Enter a name for the action (e.g.,
- Click Save action.
- In the Workflow, click + to add another action. Select HTTP request. Configure the action:
- Action name: Enter a name for the action (e.g.,
HTTP request). - Slug: The slug field is automatically populated based on the action name.
- HTTP method: Select
POST. - URL: Enter the target URL.
- Headers: Enter the following key/value pairs:
- Header Key:
Authorization, Header Value:Bearer {{{context.secrets.argocd}}}- If you used a different name for your secret, replace
argocdwith your secret's name.
- If you used a different name for your secret, replace
- Header Key:
- Payload: Enter the payload referencing the output of the "User input" action. The payload that you supply can be templated and can reference an entity that the Workflow is being run with.
- In this example, you could enter:
{
  "prune": {{context.actions.user-input.outputs.prune}},
  "dryRun": {{context.actions.user-input.outputs.dry-run}},
  "revision": "{{context.actions.user-input.outputs.revision}}"
}
- Action name: Enter a name for the action (e.g.,
- Click Save action.
- Click Save Workflow.