> For the complete documentation index, see [llms.txt](https://docs.cortex.io/llms.txt). Markdown versions of documentation pages are available by appending `.md` to page URLs; this page is available as [Markdown](https://docs.cortex.io/configure/settings/entity-settings/verification.md).
# Data verification
You can set data verification policies in Cortex to make sure that entities in your Cortex workspace are accurate. Verifications prompt owners and responsible users to check certain information, as determined by the person who created the verification period.
You can [launch a Scorecard](#flag-unverified-entities-via-scorecard) to streamline the process of flagging entities that haven't yet been verified, and you can [create a CQL report](#view-incorrect-entities-via-cql-report) to view a list of all entities that have been verified as incorrect.
## Adding a verification period
### Prerequisites
* You must have the `Configure verification periods` permission.
* Optionally [configure notifications](#configure-notifications) to ensure users are notified when a verification period starts and to ensure they receive reminders for entities they own that haven't yet been verified.
### Create a verification period
1. In Cortex, navigate to the [Entity verification settings](https://app.getcortexapp.com/settings/entities/verification) page.
2. Click **+Add verification period**.\\
3. In the side panel, fill in the fields:\

* **Start date** and **End date**: Enter the start and end dates for the verification period. The start date cannot be in the past. The end date must be at least one day after the start date.
* **Name**: Enter a descriptive name for the data verification.
* **Verification instructions**: Enter clear and concise instructions that will appear on the entity's details page.
* **Require reason for verification**: Check this box to require the user to include a reason when they verify the entity and confirm that its data is invalid.
* **Team member roles responsible for verification**: Select which Cortex users will be responsible for verifying data.
* If you select multiple roles, any team member with one of those roles can verify data.
* If you do not select a team member role, any direct member of the entity's owning team can verify data.
* This setting matches against a user's team member role in Cortex, not their job title or their role in an external system. If your team members don't have Cortex team roles assigned, restricting verification to a role means no one can verify. See [Who can verify an entity](#who-can-verify-an-entity).
* **Entities to verify**: Specify which entities the verification policy applies to:
* **Selection type**: Choose whether to include or exclude the entity types you specify for this verification.
* **Entity types**: Specify which entity types this verification applies to.
* **Advanced options**: Further refine your selection by including or excluding groups, or defining a CQL expression.\\
4. Click **Create verification period**.
Within a few minutes of saving the verification period, it will appear in the list of verifications on the Entity verification settings page.
### Configure notifications for data verification
You can choose to configure notifications for a verification period start date and for reminders during the ongoing verification period.
* **Verification period reminder:** Users will receive a notification on Mondays during the ongoing verification period, reminding them of any entities they own that need to be verified.\

* **Verification period started**: Users will receive a notification when a verification period has started for an entity they own.
Learn more in the [Notifications docs](/configure/settings/notifications.md).
### Deleting or editing a verification
You can delete or edit a verification period on the [Entity verification settings page](https://app.getcortexapp.com/settings/entities/verification).
* To delete a verification, click the trash icon on the right side of the list.
* To edit a verification, click the pen icon on the right side of the list.
* Note that the edit option is disabled for verifications that are completed or expired.
## Viewing and verifying pending verifications
### View all verifications
You can see the list of all verifications in the [Entity verification settings](https://app.getcortexapp.com/settings/entities/verification) page. At a glance, see the status, time period, and progress for each verification.
### View all entities associated with a verification
You can view a list of all entities associated with a verification:
1. While viewing the verification list in the [Entity verification settings](https://app.getcortexapp.com/settings/entities/verification), click a row.
2. A side panel will appear, displaying all entities that this verification applies to:\

* In this side panel, you can also see at a glance which entities have been verified, which user verified them, and the date of the verification.
* Click an entity to view its entity details page.
### View your assigned verifications
When [notifications are enabled](#configure-notifications-for-data-verification), any users responsible for verifying data will be notified when the period begins, and will receive weekly reminders with outstanding verifications.
In addition to receiving notifications, you can also see a list of all outstanding verifications you are responsible for in your [engineering homepage](/streamline/homepage.md). If you have any entities that require verification, you will see a **Pending verifications tab** on the homepage.
#### Who can verify an entity
To verify an entity, you must be a direct member of a team that owns it. A few things to keep in mind:
* Ownership alone isn't enough if it's indirect. If your team owns the entity through ownership inheritance, or you're a member of a parent team rather than the owning team itself, you can't verify the entity.
* There's no global verifier role. Workspace-level permissions, including `Configure verification periods`, let you set up and manage verification periods, but they don't let you verify an entity you don't own.
* If the verification period specifies **Team member roles responsible for verification**, you also need one of those roles on the owning team. Without a matching role, you can't verify the entity even if you're a direct member.
If you don't meet these requirements, the **Verify entity** button doesn't appear on the entity's details page.
**Verification and externally synced teams**
If you sync team membership from an identity provider such as Workday, GitHub, or Datadog, the sync brings in who belongs to each team, but it doesn't always bring in each member's role. Members imported without a role have no Cortex team member role at all.
This matters when a verification period restricts verification to specific roles. If no one on the owning team has a matching role, no one can verify the entity, and no error is shown.
To verify entities on externally synced teams, do one of the following:
* Enable **Sync team roles from identity providers** under **Settings > Entities > Teams** so Cortex assigns roles based on your enabled identity providers. See Team roles for more information.
* Leave **Team member roles responsible for verification** empty when you create the verification period, so any direct member of the owning team can verify.
### Verify an entity
1. Navigate to the entity you need to verify.
2. At the top of the entity's details page, click **Verify entity**.\\
3. Review the verification instructions. If the entity data is correct, click **Data is correct**, then click **Submit**. When prompted to confirm again, click **Yes**.\

* If there is more than one outstanding verification, they'll be listed sequentially by due date.
* If the data is invalid and this verification requires a reason, you will need to enter a reason into the text field before you click **Submit**.\

Once all data verifications have been processed, the entity will display a `Verified` badge.
#### **The "Verify entity" button isn't showing**
The **Verify entity** button only appears when you're eligible to verify that entity, and there's no tooltip or message when you aren't. If you expect to see it but don't, check the following:
1. The entity is in scope of a verification period. Confirm the entity matches the verification's **Entities to verify** settings on the **Entity verification settings** page.
2. The verification period is active. The button doesn't appear before the start date or after the end date.
3. You're a direct member of a team that owns the entity. Membership in a parent team, or ownership that reaches the entity through inheritance, doesn't make you eligible.
4. You have a required role, if the verification specifies one. Check **Team member roles responsible for verification** on the verification period, then confirm you hold that role on the owning team.
5. Your team's roles are populated. If team membership syncs from an identity provider, members may have no role assigned. See Verification and externally synced teams.
#### Viewing verification statuses
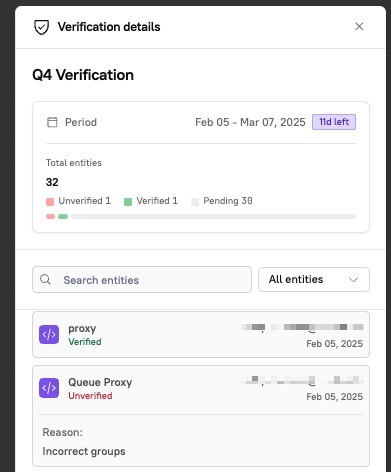
Entities that have been labeled as correct, incorrect, or are still pending review are listed under [**Settings > Entities > Data verification**](https://app.getcortexapp.com/settings/entities/verification). If an entity was labeled as incorrect, the reason is visible there:
## View all unverified or incorrect entities
### Flag unverified entities via Scorecard
You can launch a Scorecard to automatically flag entities that have not been verified:
1. Navigate to [**Scorecards**](https://app.getcortexapp.com/admin/scorecards). Click **+Create Scorecard**.
2. Locate the template called "Entity Verification" and click **+Use**.
3. Make edits to the templated configuration if necessary, then click **Create Scorecard**.
The Scorecard will automatically evaluate your entities. If an entity has not been verified, the entity's owner will see a task appear on their [engineering homepage](/streamline/homepage.md) to let them know.
### View incorrect entities via CQL report
You can create a CQL report to view all entities that have been verified as incorrect through data verification.
1. Navigate to [**Tools > CQL reports**](https://app.getcortexapp.com/admin/cql-reports).
2. Locate the template "Entity Verification Report," then click **+Use**.
3. Modify the report template as needed, then click **Create**.