> For the complete documentation index, see [llms.txt](https://docs.cortex.io/llms.txt). Markdown versions of documentation pages are available by appending `.md` to page URLs; this page is available as [Markdown](https://docs.cortex.io/standardize/cql/cql-reports.md).
# Using CQL reports
CQL reports let you query your entities with Cortex Query Language (CQL) and visualize the raw results. Use them when you need to extract, analyze, or share detailed data that goes beyond pass/fail checks, or when you want a reusable report that refreshes on its own.
CQL reports give you more flexibility than Scorecards or Query builder:
* View any expression result, such as the exact number of incidents, deployment counts, or custom data values for each entity. Scorecards and Query builder require expressions to evaluate to a boolean.
* Build custom reports that aggregate and display data from entity metadata, integrations, and custom data.
* Debug Scorecard results by surfacing the underlying data that drives rule outcomes.
* Export filtered data for further analysis or sharing.
## Creating a CQL report
Users with the `Run Query Builder` permission can create and run a CQL report. To run queries on third-party integrations, the `Run Query Builder with Third-party Integrations` permission is also needed.
**To create a CQL report**:
1. From the main sidebar, expand **Tools**, then select **CQL reports**.
2. In the upper-right corner of the CQL reports page, click **Create CQL report**.
3. Do one of the following:
* Click **Start from scratch** to build your own report.
* Select a template to start from a prebuilt report.
* Templates include your organization's own and Cortex's built-in options, so your report follows best practices from the start.
4. Configure the report details:
1. In the **Details** section:
1. **CQL report name** - Enter a name for the report (required).
2. **Description** - Enter a description for the report. This helps others in your workspace understand the purpose of the report.
3. **Enable auto refresh** - Toggle on this setting if the report should be automatically evaluated on a specified interval.
1. **Evaluation window** - Set how often Cortex evaluates the report. Cortex evaluates the report every 24 hours by default. The shortest window you can set is 12 hours and the longest is 336 hours. Choosing a longer window can help you stay within your integrations' rate limits.
2. In the **Apply to specific entities** section:
1. Narrow the report's scope by selecting entity types from the **Search entity types** dropdown. Leave it blank to apply the report to all entities.
2. **Advanced options** - Refine your selection further by including or excluding groups. You can [test and iterate](/standardize/cql.md#cql-testing) on a CQL expression as you write it.
* You can't query third-party integrations when refining the entity selection for a CQL report.
3. In the **Columns** section:
1. Click **Add column** to add new CQL expressions to the report. When you add or edit columns, choose how to define them: write a CQL expression in the **Query builder**, or select rules from your configured integrations in the **Form builder**. In the **Add column** side panel, do the following:
1. From the **CQL** tab:
1. Click **Add CQL query** to open the **Query builder**.
2. Add and test your query.
3. Click **Save query**.
4. Under **Name**, enter a name for the column (required).
5. Optionally, enter a description of the column.
6. Click **Save column**.
2. From the **Form** tab:
1. Select an integration from the **Integration** dropdown.
2. Select a rule from the **Rule** dropdown.
3. Under **Name**, enter a name for the column (required).
4. Optionally, enter a description of the column.
5. Click **Save column**.
5. If you want your report to be publicly available to other users in your workspace, toggle on **Public**.
6. Click **Create**.
{% hint style="info" %}
A cell value can hold a maximum of 12 KB (12288 bytes). If a return value exceeds that (e.g. a 5 MB JSON file), the cell errors out, so define raw values for your outputs.
{% endhint %}
**To edit an existing CQL report**:
1. Open the CQL report you want to edit.
2. In the upper-right corner of the page, click **Edit**.
3. Make any necessary changes, then click **Save**.
## Viewing a CQL report
To view a CQL report, expand **Tools** from the main sidebar, then select **CQL reports**.
{% hint style="info" %}
Select the **All** tab to view every CQL report in your organization, including drafts. Select the **Public** tab to view only published reports.
{% endhint %}
### Sorting and filtering a CQL report
Every CQL report has a toolbar above the results table. Use it to narrow a report down to the entities and columns you care about.
You can sort by each column of the report, select which columns are displayed, search across the values in any of the report's columns, and filter by AWS account, AWS region, domain, entity, entity type, group, owner, or team.
**Sorting the results**
Click a column header to sort by that column, then click it again to reverse the direction.
You can also click the sort button in the toolbar, which is labeled with the field you're currently sorting by, e.g. Name. Select a column, then click the arrow next to your selection to switch between ascending and descending.
**Choosing which columns appear**
Click **Display** to show or hide columns. Click **Show all** to turn on every column, or **Reset display** to go back to the report's default columns. Click **Done** when you're finished.
**Filtering the results**
1. In the toolbar, click **Filter**.
2. Select a field from the panel on the left: AWS accounts, AWS regions, Domains, Entities, Entity types, Groups, Owners, or Teams.
3. From the dropdown, select the values you want to keep. Search for a specific value, click **Select all**, or turn on **Show only selected** to review what you've picked.
4. Repeat for as many fields as you need.
5. Click **Apply**.
The Filter button shows how many filters are active. To remove one filter, click the **trash icon** on its card. To clear all of them, click the **X** next to the filter count, or click **Reset filters**. Cancel discards any changes you haven't applied yet.
### Sharing a CQL report
A report must be set to **Public** in order to share it.
You may need to share a CQL report with teams or leaders to provide detailed, custom insights into entity data, compliance, or operational metrics.
In the upper-right corner of the page, click **Export CSV** to download a CSV file of the report data:
Large reports can take a while to download. While the download is in progress, click **Email me** in the notification in the bottom-right corner of the page to have the CSV sent to your Cortex login email instead:
### Refreshing a CQL report
Cortex doesn't refresh a CQL report on its own unless you turn on auto refresh. The top right of a report page shows when its data was last refreshed, or tells you the data has expired and needs a refresh.
**To refresh a report manually**:
1. Open the report.
2. Click the **overflow menu icon** in the upper-right corner of the page.
3. Click **Refresh CQL report**.
**To enable auto refresh**:
Auto refresh is off by default. You can turn it on while you create a CQL report, or edit an existing report to add it later.
1. Open the report.
2. In the upper-right corner of the page, click **Edit**.
3. In the **Details** section, toggle on **Enable auto refresh**.
4. Set the **Evaluation window (in hours)**. Cortex evaluates the report every 24 hours by default. The shortest window you can set is 12 hours and the longest is 336 hours. Choosing a longer window can help you stay within your integrations' rate limits.
5. Click **Save**.
{% hint style="warning" %}
If a report contains expressions written with an outdated version of CQL, a warning banner at the top of the page tells you the report can't be refreshed. Update the outdated queries, then refresh the report.
{% endhint %}
## Using CQL reports to debug Scorecards
You can use CQL reports to help interpret unexpected results from Scorecards.
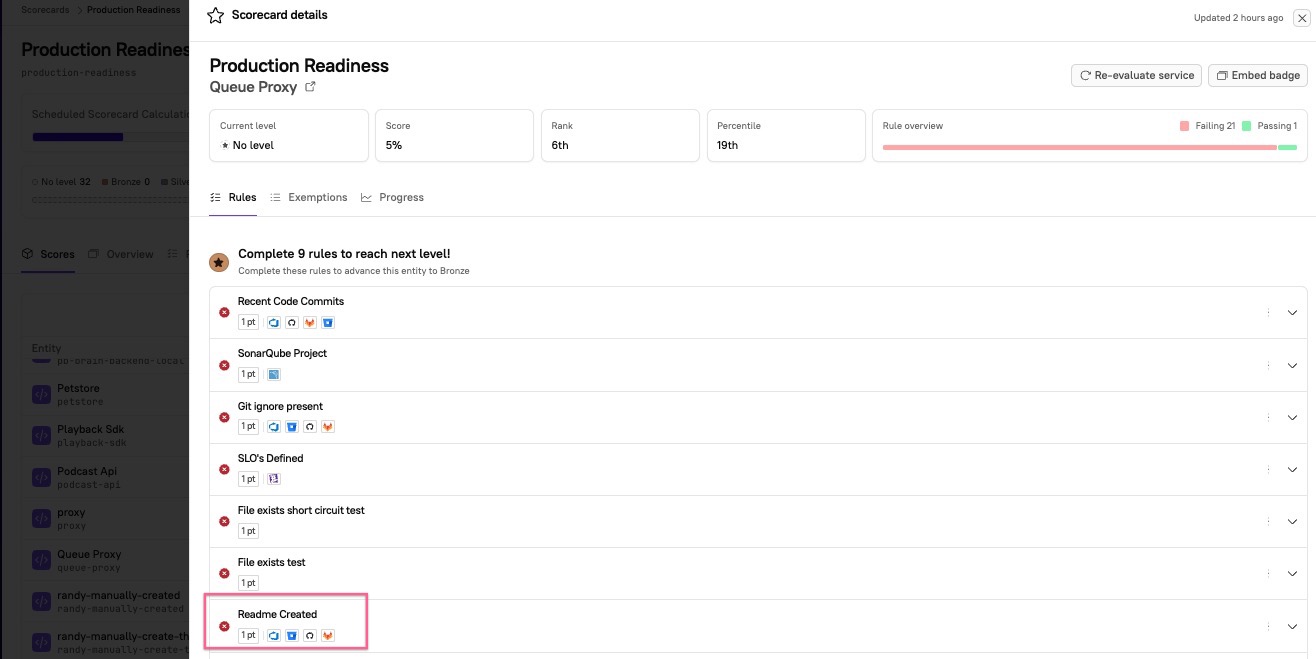
For example, let's say you have a service that is failing the rule `README created`. However, you believe the service does have a `README`, and you aren't sure why it's failing this rule.
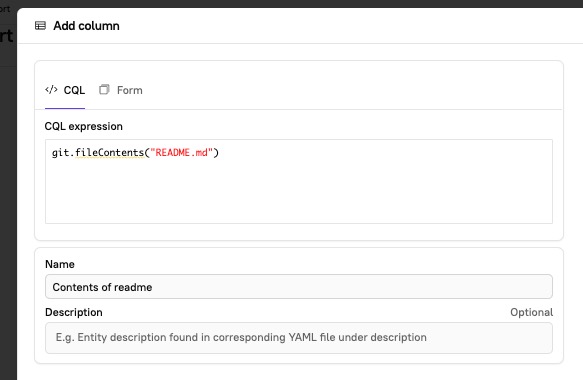
You can create a CQL report from scratch and add a new column for the `README` CQL expression to check for `README.md` in the git repo:
After saving the CQL report, you can view the results to see the contents of `README` files for each entity. In this report, you can see if the `README` contains an error such as "The result is too large to store," which would explain why the entity is failing that rule in the Scorecard.