> ## Documentation Index
> Fetch the complete documentation index at: https://docs.cortex.io/llms.txt
> Use this file to discover all available pages before exploring further.
# Importing entities from AWS
> Automatically import AWS resources as entities, discover dependencies between them, and keep ownership in sync
Cortex connects to many third-party vendors whose system interfaces frequently change. As a result, integration behavior or configuration steps may shift without notice. If you encounter unexpected issues, check with your system administrator or refer to the vendor's documentation for the most current information. Additionally, integration sync times vary and are subject to scheduling overrides and timing variance.
This article explains how to import entities from AWS. For configuration instructions, see [Configuring the integration for AWS](/ingesting-data-into-cortex/integrations/aws/importing-entities-from-aws). For instructions on using the integration, see [Using the integration for AWS](/ingesting-data-into-cortex/integrations/aws/using-the-integration-for-aws).
### Keep in mind
When importing from AWS, Cortex replaces non-alphanumeric characters in entity names with a space. For example, `resource_1` becomes `resource 1`.
For the [Cortex tag](/ingesting-data-into-cortex/entities-overview/entities#cortex-tag), Cortex replaces non-alphanumeric characters with `-` and lowercases the letters. If multiple special characters appear together in a tag, Cortex replaces the group of characters with only one `-`. For example, `mY_e%ntity#$_tag` becomes `my-e-ntity-tag`.
## Importing an entity from AWS
Cortex gives you two ways to import entities from AWS: automatically or manually.
Turn on auto import and Cortex creates an entity for every resource it discovers in the Cloud Control types you've selected, then keeps them in sync as your AWS environment changes.
Import manually instead if you'd rather pick exactly which discovered resources land in your catalog and set details like ownership and repository as you go.
If an entity already exists in Cortex, you can connect it to specific AWS resources by adding an `x-cortex-infra` block to its YAML.
### Prerequisites
1. Ensure that Cortex only pulls the cloud control types you want it to:
1. From the main sidebar, select **Integrations**.
2. Locate AWS, then click **Settings**.
3. Select the **Integration settings** tab.
4. From the **Cloud control types** dropdown, select the types you want Cortex to discover.
* When you turn on auto-import for AWS, Cortex imports these types automatically.
* To remove an auto-imported cloud control type, click the **X** next to its name, then click **Save cloud control types**.
5. Click **Save cloud control types**.
If a type does not appear in the list, ensure that `cloudformation:ListTypes`, `cloudformation:ListResources`, and `cloudformation:GetResource` are added to your IAM policy.
```
AWS::ApiGateway::DocumentationVersion
AWS::ApiGateway::Step
AWS::CloudFormation::ResourceVersion
AWS::CustomerProfiles::Integration
AWS::CustomerProfiles::ObjectType
AWS::EC2::TransitGatewayMulticastGroupMember
AWS::EC2::TransitGatewayMulticastGroupSource
AWS::ECS::TaskSet
AWS::Glue::Attach::SchemaVersion
AWS::Glue::Attach::SchemaVersionMetadata
AWS::IoTSiteWise::AccessPolicy
AWS::IoTSiteWise::Dashboard
AWS::IoTSiteWise::Project
AWS::Kendra::DataSource
AWS::Kendra::Faq
AWS::MediaConnect::FlowEntitlement
AWS::MediaConnect::FlowOutput
AWS::MediaConnect::FlowSource
AWS::MediaConnect::FlowVpcInterface
AWS::MediaPackage::Asset
AWS::MediaPackage::PackagingConfiguration
AWS::NetworkFirewall::LoggingConfiguration
AWS::QuickSight::Analysis
AWS::QuickSight::Dashboard
AWS::QuickSight::DataSet
AWS::QuickSight::DataSource
AWS::QuickSight::Template
AWS::QuickSight::Theme
AWS::RDS::DBProxyTargetGroup
AWS::S3Outposts::AccessPoint
AWS::S3Outposts::Bucket
AWS::SSO::Assignment
AWS::SSO::InstanceAccessControlAttributeConfiguration
AWS::SSO::PermissionSet
```
If the type you want to import is in the list above, contact [support@cortex.io](mailto:support@cortex.io) to submit a feature request.
### Automatically importing AWS entities
Users with the `Manage Integrations` permission can enable auto import of AWS resources.
Follow the steps below to configure automatic import from AWS. If you don't want Cortex to auto import AWS resources, you can [manually import them](/ingesting-data-into-cortex/integrations/aws/importing-entities-from-aws#manually-importing-aws-services-via-entity-descriptor).
1. From the main sidebar, click your avatar in the bottom-left corner.
2. Select **Settings**.
3. From the **Settings** menu, locate the **Workspace** section, then expand **Entities**.
4. Select **General**.
5. Under **Entity settings**, toggle on **Auto import from AWS, Azure, and/or Google Cloud**.
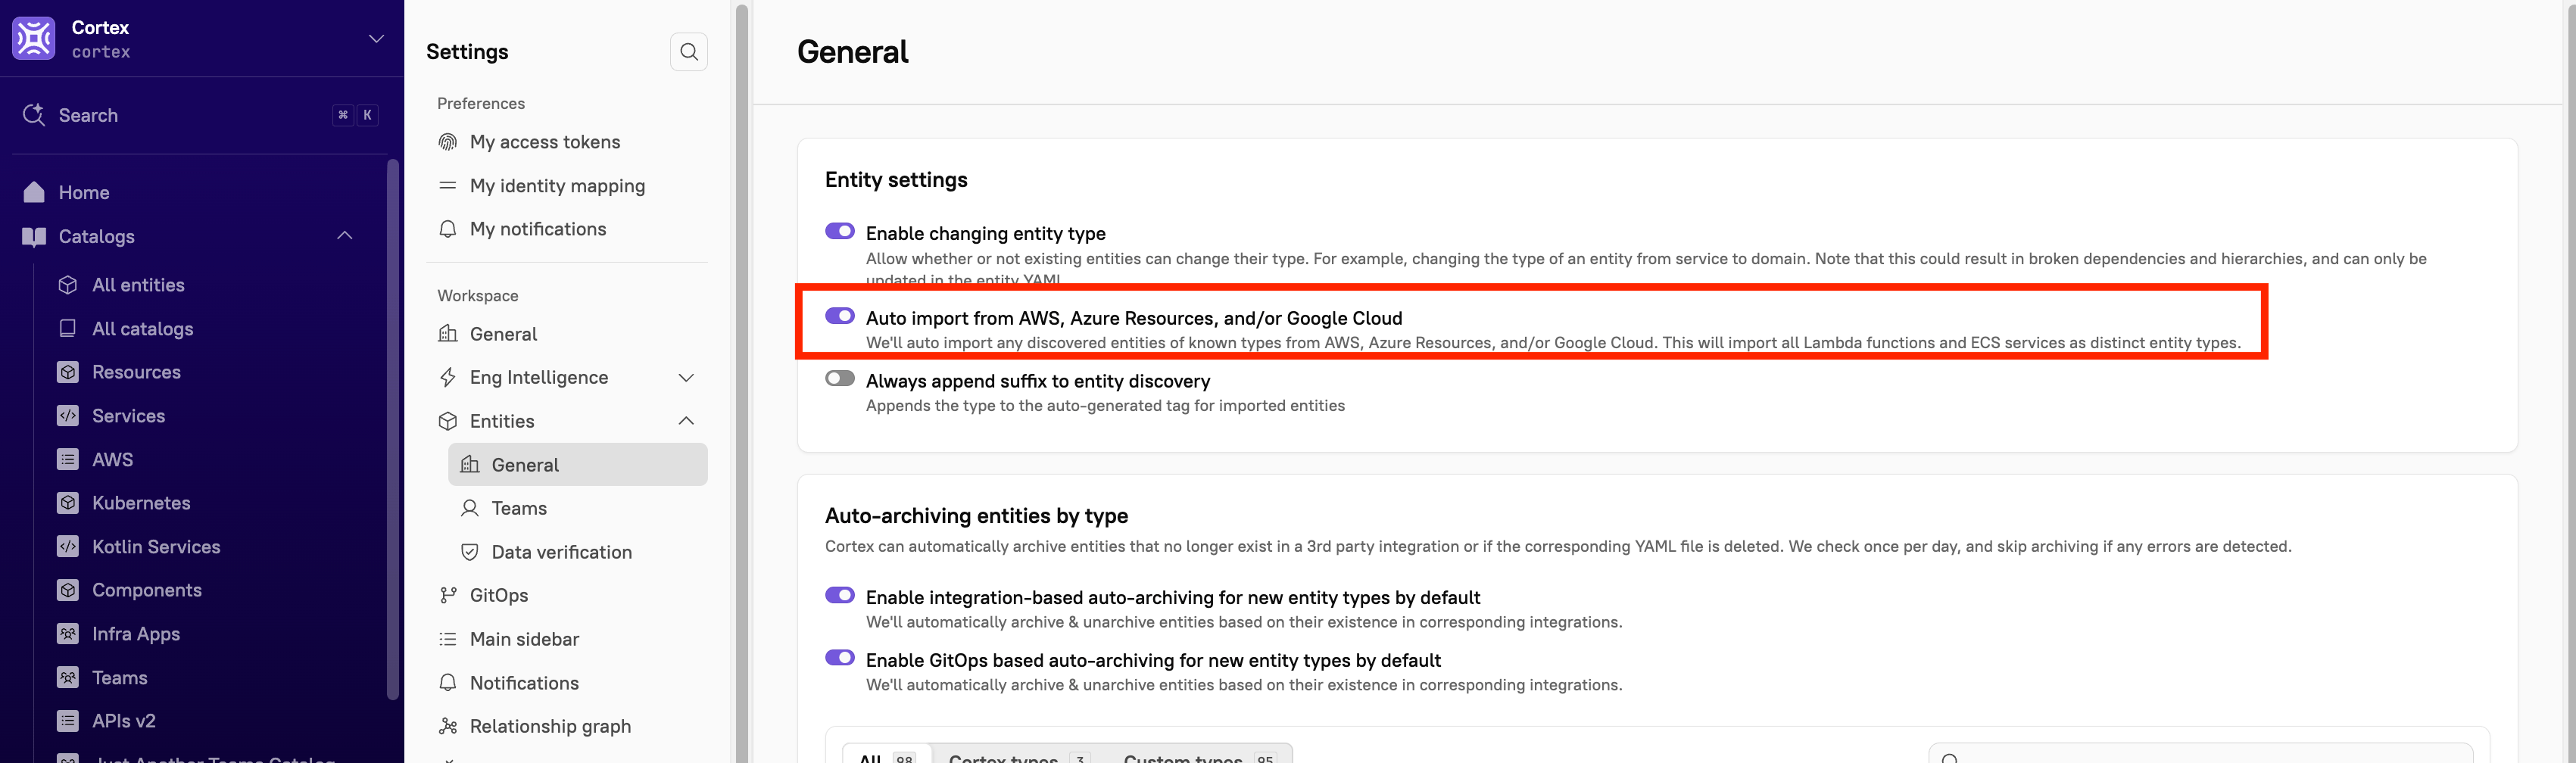 After you toggle on auto-import, Cortex imports all entities of the selected types into your catalog, and keeps importing new ones as it discovers them.
#### Limiting discovery to specific regions
By default, Cortex searches for resources across all AWS regions, but you can limit that to specific regions.
1. From the main sidebar, select **Integrations**.
2. Locate AWS, then click **Settings**.
3. Select the **Integration settings** tab.
4. Scroll to **Regions**, then select one or more regions from the dropdown.
After you toggle on auto-import, Cortex imports all entities of the selected types into your catalog, and keeps importing new ones as it discovers them.
#### Limiting discovery to specific regions
By default, Cortex searches for resources across all AWS regions, but you can limit that to specific regions.
1. From the main sidebar, select **Integrations**.
2. Locate AWS, then click **Settings**.
3. Select the **Integration settings** tab.
4. Scroll to **Regions**, then select one or more regions from the dropdown.
.png?fit=max&auto=format&n=pbVnLtaKpBTlBN5p&q=85&s=c72ac7b6ae5106ac9820765dec6db767 "Aws Regions (1)") 5. Click **Save regions**. Cortex will now only search across the regions you specified.
### Manually importing AWS entities
Follow the steps below to manually import from AWS. If you don't want to import manually, you can [automatically import them](/ingesting-data-into-cortex/integrations/aws/importing-entities-from-aws#automatically-importing-aws-entities).
1. From the main sidebar, expand **Catalogs**, then select **All entities**.
2. In the upper-right corner, click **Import entities**.
3. Select **Import discovered entities**.
4. Select AWS. The **Select entities to import** page is displayed.
5. A list of entities is displayed. Select the checkboxes next to the entities you want to import. Use the search bar to find entities by name, or click the **Filter icon** in the upper-right corner of the results list to filter by entity type.
6. In the bottom-right corner, click **Next step**. The **Edit details** page is displayed.
7. Configure the following:
1. From the **Type** drop-down menu, select **Service.**
2. In the **Details** section:
1. Under **Entity name**, enter a name for the entity (required).
2. The **Cortex tag** field is auto-populated based on the name of the entity (required). It's a unique identifier for the entity. This is also known as the `x-cortex-tag`.
3. Under **Description**, enter a description of the entity to help others understand its purpose.
4. From the **Groups** drop-down, select a group or groups [to segment the entity](/ingesting-data-into-cortex/entities-overview/entities/groups).
3. In the **Repository** section:
1. From the **Provider** drop-down menu, select the repo provider.
2. From the **Alias** drop-down menu, select the alias of the connected provider account that has access to the repository.
3. From the **Repository** drop-down menu, select the repo associated with the entity. If you don't see it listed, click **Refresh repositories** to pull in the latest list.
4. Under **Basepath**, enter the subdirectory within the repo where the entity's code lives. Leave blank if the entity occupies the entire repo.
4. In the **Owners** section, define [ownership](/ingesting-data-into-cortex/entities-overview/entities/ownership) for the entity. Ownership can be assigned to either teams or individual users. It's recommended to select team owners to keep the ownership information up to date through any future personnel changes. To add a team or teams, click **Add** in the **Teams** area. To add an individual user or users, click **Add** in the **Users** area.
* Cortex may recommend owners [based on repository activity](/ingesting-data-into-cortex/entities-overview/entities/ownership#recommendation). You can accept or reject the recommendations.
5. In the **Links** section, click **Add** to add links to external documentation, such as runbooks, docs, logs, or custom categories.
6. In the **Slack channels** section, click **Add** to link a Slack channel to the entity. If enabled, you'll receive notifications about the entity in the selected Slack channel.
7. In the **Parents** section, select a parent domain or domains from the drop-down menu. This is where you configure the hierarchy for your entity, which can be visualized in the [relationship graph](/ingesting-data-into-cortex/entities-overview/entities/relationship-graph).
8. In the **Dependencies** section, click **Add entity** to select an entity or entities that this entity depends on. These can be visualized in the [relationship graph](/ingesting-data-into-cortex/entities-overview/entities/relationship-graph).
8. If you selected more than one entity, click **Next entity** in the bottom-right corner of the page.
9. Click **Confirm import**. The entity is imported into Cortex.
### Editing an entity via its descriptor
To connect a Cortex entity to one or more AWS resources, add the `x-cortex-infra` block to the entity's YAML. For certain AWS resource types, Cortex displays those AWS entities' metadata on the Cortex entity page.
| Field | Description | Required? |
| - | - | - |
| `type` | The AWS Cloud Control resource type, e.g. `AWS::RDS::DBInstance` | |
| `region` | The AWS region the resource belongs to | |
| `accountId` | The AWS account ID the resource belongs to | |
| `identifier` | The primary identifier of the resource | |
**Example**
```yaml theme={null}
x-cortex-infra:
aws:
cloudControl:
- type: AWS::RDS::DBInstance
region: us-west-2
accountId: "623456123456"
identifier: checkout-db-prod
```
#### Connecting multiple ECS services to a single entity
To connect a Cortex entity to multiple ECS services, use one of the formats below, depending on whether you're using Cloud Control resource types.
| Field | Description | Required? |
| - | - | - |
| `type` | Must be `AWS::ECS::Service` | |
| `region` | The AWS region the service belongs to | |
| `accountId` | The AWS account ID the service belongs to | |
| `identifier` | The primary identifier of the service | |
**Example**
```yaml theme={null}
x-cortex-infra:
aws:
cloudControl:
- type: AWS::ECS::Service
region: us-west-2
accountId: "623456123456"
identifier: checkout-service
- type: AWS::ECS::Service
region: us-east-1
accountId: "345673456731"
identifier: checkout-service-dr
```
#### Using the legacy ECS format
If you're not using Cloud Control types, or you imported your entity before Cortex supported Cloud Control types, use the format below.
| Field | Description | Required? |
| - | - | - |
| `clusterArn` | The ECS cluster's ARN. See [ECS](https://docs.aws.amazon.com/general/latest/gr/aws-arns-and-namespaces.html) for details. | |
| `serviceArn` | The ECS service's ARN. See [ECS](https://docs.aws.amazon.com/general/latest/gr/aws-arns-and-namespaces.html) for details. | |
**Example**
```yaml theme={null}
x-cortex-infra:
aws:
ecs:
- clusterArn: arn:aws:ecs:us-west-2:123456789012:cluster/checkout-cluster
serviceArn: arn:aws:ecs:us-west-2:123456789012:service/checkout-cluster/checkout-service
- clusterArn: arn:aws:ecs:us-east-1:123456789012:cluster/checkout-cluster-dr
serviceArn: arn:aws:ecs:us-east-1:123456789012:service/checkout-cluster-dr/checkout-service-dr
```
### Discovery audit
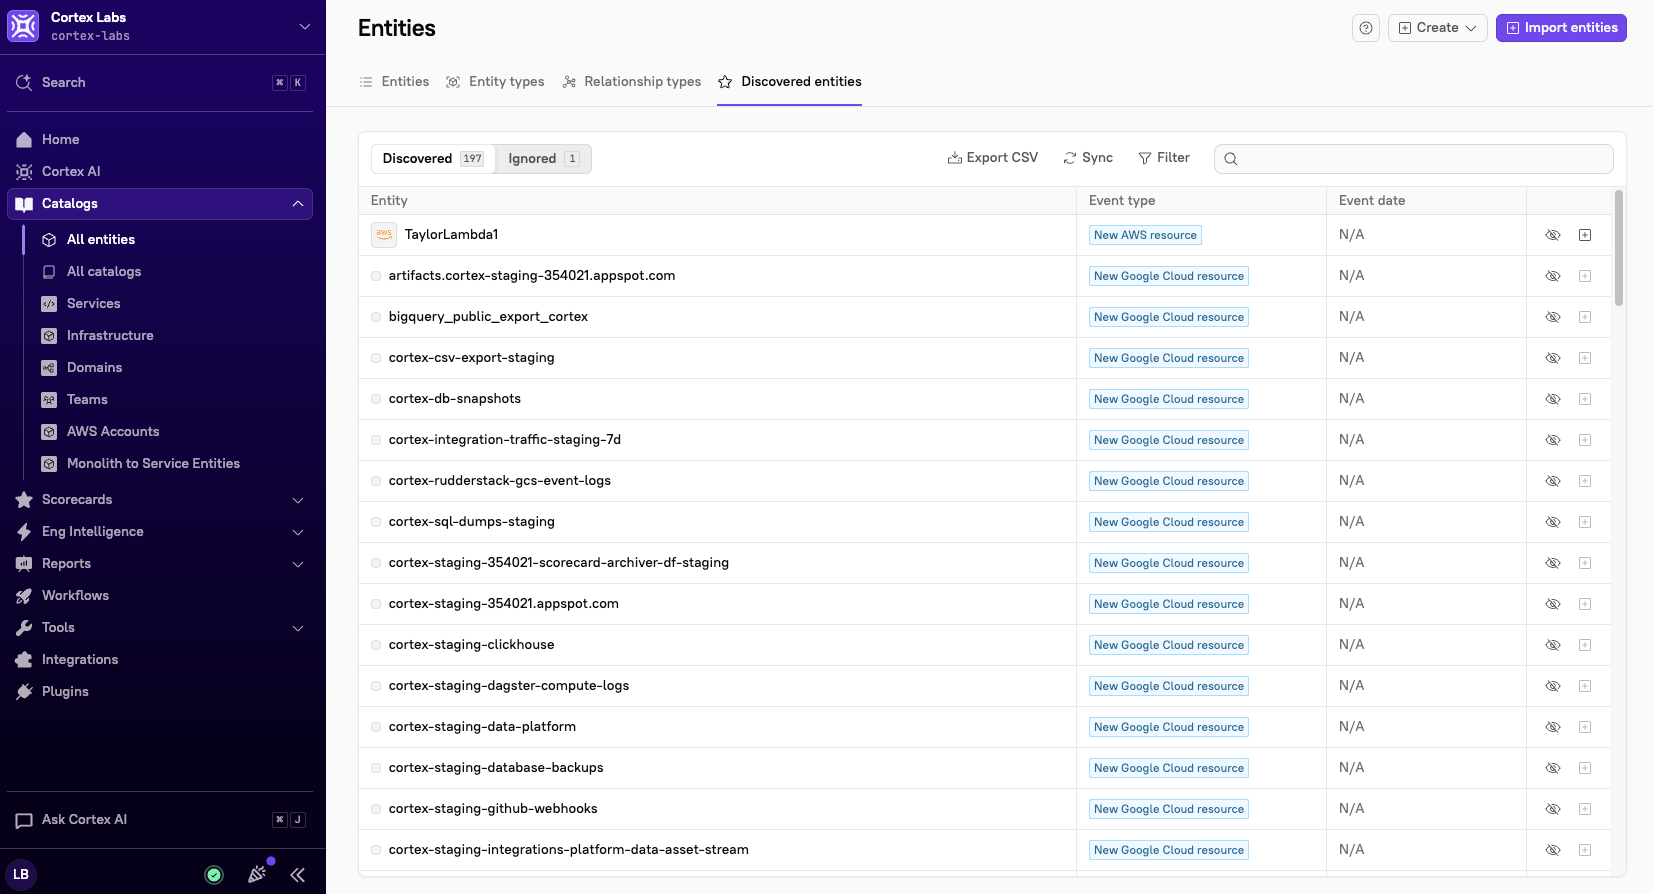
Cortex pulls recent changes from your AWS environment into the [discovered entities list](/ingesting-data-into-cortex/entities-overview/entities/discovery-audit), where you can find:
* New entities in AWS that haven't been imported into your Cortex catalog. These are tagged **New AWS Resource**.
* Entities in the catalog that no longer exist in AWS. These are tagged **AWS Resource Not Detected**.
5. Click **Save regions**. Cortex will now only search across the regions you specified.
### Manually importing AWS entities
Follow the steps below to manually import from AWS. If you don't want to import manually, you can [automatically import them](/ingesting-data-into-cortex/integrations/aws/importing-entities-from-aws#automatically-importing-aws-entities).
1. From the main sidebar, expand **Catalogs**, then select **All entities**.
2. In the upper-right corner, click **Import entities**.
3. Select **Import discovered entities**.
4. Select AWS. The **Select entities to import** page is displayed.
5. A list of entities is displayed. Select the checkboxes next to the entities you want to import. Use the search bar to find entities by name, or click the **Filter icon** in the upper-right corner of the results list to filter by entity type.
6. In the bottom-right corner, click **Next step**. The **Edit details** page is displayed.
7. Configure the following:
1. From the **Type** drop-down menu, select **Service.**
2. In the **Details** section:
1. Under **Entity name**, enter a name for the entity (required).
2. The **Cortex tag** field is auto-populated based on the name of the entity (required). It's a unique identifier for the entity. This is also known as the `x-cortex-tag`.
3. Under **Description**, enter a description of the entity to help others understand its purpose.
4. From the **Groups** drop-down, select a group or groups [to segment the entity](/ingesting-data-into-cortex/entities-overview/entities/groups).
3. In the **Repository** section:
1. From the **Provider** drop-down menu, select the repo provider.
2. From the **Alias** drop-down menu, select the alias of the connected provider account that has access to the repository.
3. From the **Repository** drop-down menu, select the repo associated with the entity. If you don't see it listed, click **Refresh repositories** to pull in the latest list.
4. Under **Basepath**, enter the subdirectory within the repo where the entity's code lives. Leave blank if the entity occupies the entire repo.
4. In the **Owners** section, define [ownership](/ingesting-data-into-cortex/entities-overview/entities/ownership) for the entity. Ownership can be assigned to either teams or individual users. It's recommended to select team owners to keep the ownership information up to date through any future personnel changes. To add a team or teams, click **Add** in the **Teams** area. To add an individual user or users, click **Add** in the **Users** area.
* Cortex may recommend owners [based on repository activity](/ingesting-data-into-cortex/entities-overview/entities/ownership#recommendation). You can accept or reject the recommendations.
5. In the **Links** section, click **Add** to add links to external documentation, such as runbooks, docs, logs, or custom categories.
6. In the **Slack channels** section, click **Add** to link a Slack channel to the entity. If enabled, you'll receive notifications about the entity in the selected Slack channel.
7. In the **Parents** section, select a parent domain or domains from the drop-down menu. This is where you configure the hierarchy for your entity, which can be visualized in the [relationship graph](/ingesting-data-into-cortex/entities-overview/entities/relationship-graph).
8. In the **Dependencies** section, click **Add entity** to select an entity or entities that this entity depends on. These can be visualized in the [relationship graph](/ingesting-data-into-cortex/entities-overview/entities/relationship-graph).
8. If you selected more than one entity, click **Next entity** in the bottom-right corner of the page.
9. Click **Confirm import**. The entity is imported into Cortex.
### Editing an entity via its descriptor
To connect a Cortex entity to one or more AWS resources, add the `x-cortex-infra` block to the entity's YAML. For certain AWS resource types, Cortex displays those AWS entities' metadata on the Cortex entity page.
| Field | Description | Required? |
| - | - | - |
| `type` | The AWS Cloud Control resource type, e.g. `AWS::RDS::DBInstance` | |
| `region` | The AWS region the resource belongs to | |
| `accountId` | The AWS account ID the resource belongs to | |
| `identifier` | The primary identifier of the resource | |
**Example**
```yaml theme={null}
x-cortex-infra:
aws:
cloudControl:
- type: AWS::RDS::DBInstance
region: us-west-2
accountId: "623456123456"
identifier: checkout-db-prod
```
#### Connecting multiple ECS services to a single entity
To connect a Cortex entity to multiple ECS services, use one of the formats below, depending on whether you're using Cloud Control resource types.
| Field | Description | Required? |
| - | - | - |
| `type` | Must be `AWS::ECS::Service` | |
| `region` | The AWS region the service belongs to | |
| `accountId` | The AWS account ID the service belongs to | |
| `identifier` | The primary identifier of the service | |
**Example**
```yaml theme={null}
x-cortex-infra:
aws:
cloudControl:
- type: AWS::ECS::Service
region: us-west-2
accountId: "623456123456"
identifier: checkout-service
- type: AWS::ECS::Service
region: us-east-1
accountId: "345673456731"
identifier: checkout-service-dr
```
#### Using the legacy ECS format
If you're not using Cloud Control types, or you imported your entity before Cortex supported Cloud Control types, use the format below.
| Field | Description | Required? |
| - | - | - |
| `clusterArn` | The ECS cluster's ARN. See [ECS](https://docs.aws.amazon.com/general/latest/gr/aws-arns-and-namespaces.html) for details. | |
| `serviceArn` | The ECS service's ARN. See [ECS](https://docs.aws.amazon.com/general/latest/gr/aws-arns-and-namespaces.html) for details. | |
**Example**
```yaml theme={null}
x-cortex-infra:
aws:
ecs:
- clusterArn: arn:aws:ecs:us-west-2:123456789012:cluster/checkout-cluster
serviceArn: arn:aws:ecs:us-west-2:123456789012:service/checkout-cluster/checkout-service
- clusterArn: arn:aws:ecs:us-east-1:123456789012:cluster/checkout-cluster-dr
serviceArn: arn:aws:ecs:us-east-1:123456789012:service/checkout-cluster-dr/checkout-service-dr
```
### Discovery audit
Cortex pulls recent changes from your AWS environment into the [discovered entities list](/ingesting-data-into-cortex/entities-overview/entities/discovery-audit), where you can find:
* New entities in AWS that haven't been imported into your Cortex catalog. These are tagged **New AWS Resource**.
* Entities in the catalog that no longer exist in AWS. These are tagged **AWS Resource Not Detected**.
 ## Relationships, ownership, and dependencies for AWS entities
### **Configuring tag-based auto-linking for AWS**
You can configure any relationship type to automatically create relationships between AWS resources and other Cortex entities based on matching AWS tag values. This is the recommended way to connect AWS resources to domains, services, or custom entities for Scorecard reporting.
The **Auto-create relationships from integration tags** section only appears when at least one AWS-backed entity type is selected as the source and/or destination.
**To configure tag-based auto-linking**:
1. From the main sidebar, expand **Catalogs**, then select **All entities**.
2. Select the **Relationship types** tab.
3. Locate the relationship type you want to configure, then click the **pencil icon**. You can also create a new relationship type.
4. Scroll to the **Auto-create relationships from integration tags** section.
5. From the **Provider** drop-down menu, select **AWS**.
6. Configure the **Source tag key** by doing one of the following:
* Enter the AWS tag key on the source entity (e.g. `cortex-entity-tag`), OR
* Toggle on **Cortex provided tag** to use Cortex's standardized managed tag key.
7. Configure the **Destination tag key** by doing one of the following:
* Enter the tag key on the destination entity (e.g. `AWS-tag-parent`), OR
* Toggle on **Cortex provided tag** to use Cortex's standardized managed tag key.
8. Click **Save** (or **Create** if it's a new relationship type).
Once a relationship type is saved with integration-backed auto-creation configured, this setting cannot be changed. To modify it, delete the relationship type and create a new one.
Cortex scans entities matching the relationship type's source and destination definitions and creates a relationship wherever tag values match. Newly configured relationships are created asynchronously and may take up to one sync cycle to appear.
**Example: Linking AWS resources to domains**
To roll AWS resources up to a domain for Scorecard reporting:
1. Tag your AWS resources with the domain they belong to (e.g. a `domain` tag with the domain's Cortex tag as the value).
2. Create or open a relationship type with AWS resources as the source and domains as the destination.
3. In the **Auto-create relationships from integration tags** section, set the source tag key to `domain` and the destination tag key to the corresponding identifier on your domain entities.
4. Click **Save**. Cortex creates the relationships automatically.
### Discovering dependencies automatically
Cortex automatically discovers dependencies between your services and resources by scanning for AWS resources tagged with specific keys. By default, a service depends on any Cortex resource whose corresponding AWS resource has a tag where the key is `service` and the value matches the service's Cortex tag.
Cortex syncs AWS tags (dependencies) daily at 8 a.m. UTC.
**To manually refresh tags**:
1. From the main sidebar, expand Tools, then select **Relationship graphs**.
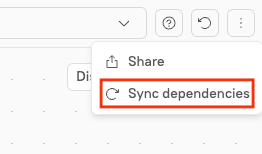
2. In the upper-right corner, click the **overflow menu icon**, then select **Sync dependencies**.
## Relationships, ownership, and dependencies for AWS entities
### **Configuring tag-based auto-linking for AWS**
You can configure any relationship type to automatically create relationships between AWS resources and other Cortex entities based on matching AWS tag values. This is the recommended way to connect AWS resources to domains, services, or custom entities for Scorecard reporting.
The **Auto-create relationships from integration tags** section only appears when at least one AWS-backed entity type is selected as the source and/or destination.
**To configure tag-based auto-linking**:
1. From the main sidebar, expand **Catalogs**, then select **All entities**.
2. Select the **Relationship types** tab.
3. Locate the relationship type you want to configure, then click the **pencil icon**. You can also create a new relationship type.
4. Scroll to the **Auto-create relationships from integration tags** section.
5. From the **Provider** drop-down menu, select **AWS**.
6. Configure the **Source tag key** by doing one of the following:
* Enter the AWS tag key on the source entity (e.g. `cortex-entity-tag`), OR
* Toggle on **Cortex provided tag** to use Cortex's standardized managed tag key.
7. Configure the **Destination tag key** by doing one of the following:
* Enter the tag key on the destination entity (e.g. `AWS-tag-parent`), OR
* Toggle on **Cortex provided tag** to use Cortex's standardized managed tag key.
8. Click **Save** (or **Create** if it's a new relationship type).
Once a relationship type is saved with integration-backed auto-creation configured, this setting cannot be changed. To modify it, delete the relationship type and create a new one.
Cortex scans entities matching the relationship type's source and destination definitions and creates a relationship wherever tag values match. Newly configured relationships are created asynchronously and may take up to one sync cycle to appear.
**Example: Linking AWS resources to domains**
To roll AWS resources up to a domain for Scorecard reporting:
1. Tag your AWS resources with the domain they belong to (e.g. a `domain` tag with the domain's Cortex tag as the value).
2. Create or open a relationship type with AWS resources as the source and domains as the destination.
3. In the **Auto-create relationships from integration tags** section, set the source tag key to `domain` and the destination tag key to the corresponding identifier on your domain entities.
4. Click **Save**. Cortex creates the relationships automatically.
### Discovering dependencies automatically
Cortex automatically discovers dependencies between your services and resources by scanning for AWS resources tagged with specific keys. By default, a service depends on any Cortex resource whose corresponding AWS resource has a tag where the key is `service` and the value matches the service's Cortex tag.
Cortex syncs AWS tags (dependencies) daily at 8 a.m. UTC.
**To manually refresh tags**:
1. From the main sidebar, expand Tools, then select **Relationship graphs**.
2. In the upper-right corner, click the **overflow menu icon**, then select **Sync dependencies**.
 Specifying a tag name is optional. If you don't specify one, Cortex uses `service` as the key name.
**To specify a tag name in Cortex**:
1. From the main sidebar, select **Integrations**.
2. Locate AWS, then click **Settings**.
3. Select the **Integration settings** tab.
4. Scroll to **Dependencies sync from AWS**, then select one or more tags from the dropdown. Note that an `AND` operator is used when you select multiple tags; the resource needs to have all specified tags in order to be recognized by Cortex.
Specifying a tag name is optional. If you don't specify one, Cortex uses `service` as the key name.
**To specify a tag name in Cortex**:
1. From the main sidebar, select **Integrations**.
2. Locate AWS, then click **Settings**.
3. Select the **Integration settings** tab.
4. Scroll to **Dependencies sync from AWS**, then select one or more tags from the dropdown. Note that an `AND` operator is used when you select multiple tags; the resource needs to have all specified tags in order to be recognized by Cortex.
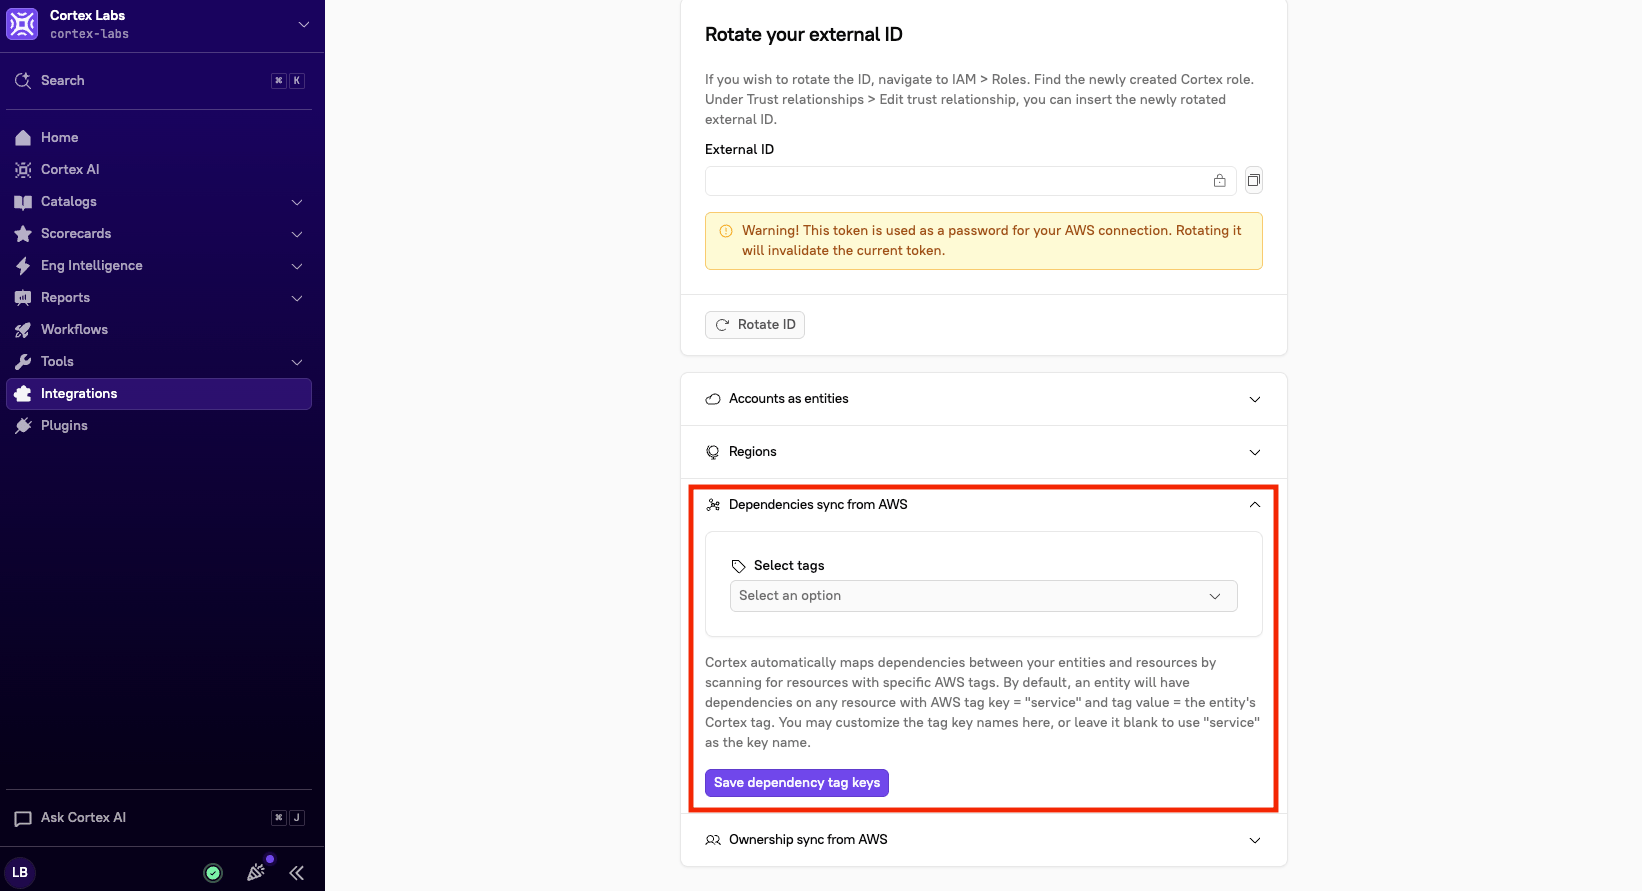 5. Click **Save dependency tag keys**.
#### **Using key/value pairs in the entity descriptor for dependency discovery**
You can also define explicit tag key/value pairs in the `x-cortex-dependency` block for AWS dependency discovery. Instead of matching on service tags, Cortex matches a service to any AWS resource whose tags match the key/value pairs you define in the service's `x-cortex-dependency` block.
For example, the service below depends on any AWS resource tagged with key `service` and value `checkout-service`, key `team` and value `checkout-team`, or a resource created by the CloudFormation stack `checkout-service-prod`.
```yaml theme={null}
x-cortex-dependency:
aws:
tags:
- key: service
value: checkout-service
- key: team
value: checkout-team
- key: "aws:cloudformation:stack-name"
value: "checkout-service-prod"
- key: "aws:cloudformation:stack-id"
value: "arn:aws:cloudformation:us-west-2:123456789012:stack/checkout-service-prod/1a2b3c4d-5e6f-4a1b-8c9d-0e1f2a3b4c5d"
```
For more information, see the [Dependencies documentation](/ingesting-data-into-cortex/entities-overview/entities/adding-entities/dependencies).
### **Auto-creating AWS account entities**
Users with the `Manage Integrations` permission can configure the auto-creation of AWS account entities.
When enabled, Cortex automatically creates an entity for each AWS account connected to your integration and links it to its AWS resources through a built-in, Cortex-managed relationship.
The **Auto import from AWS, Azure, and/or Google Cloud** setting must be [toggled on](/ingesting-data-into-cortex/integrations/aws/importing-entities-from-aws#automatically-importing-aws-entities) prior to auto-creating AWS account entities.
**To enable AWS account auto-creation:**
1. From the main sidebar, select **Integrations**.
2. Locate AWS, then click **Settings**.
3. Select the **Integration settings** tab.
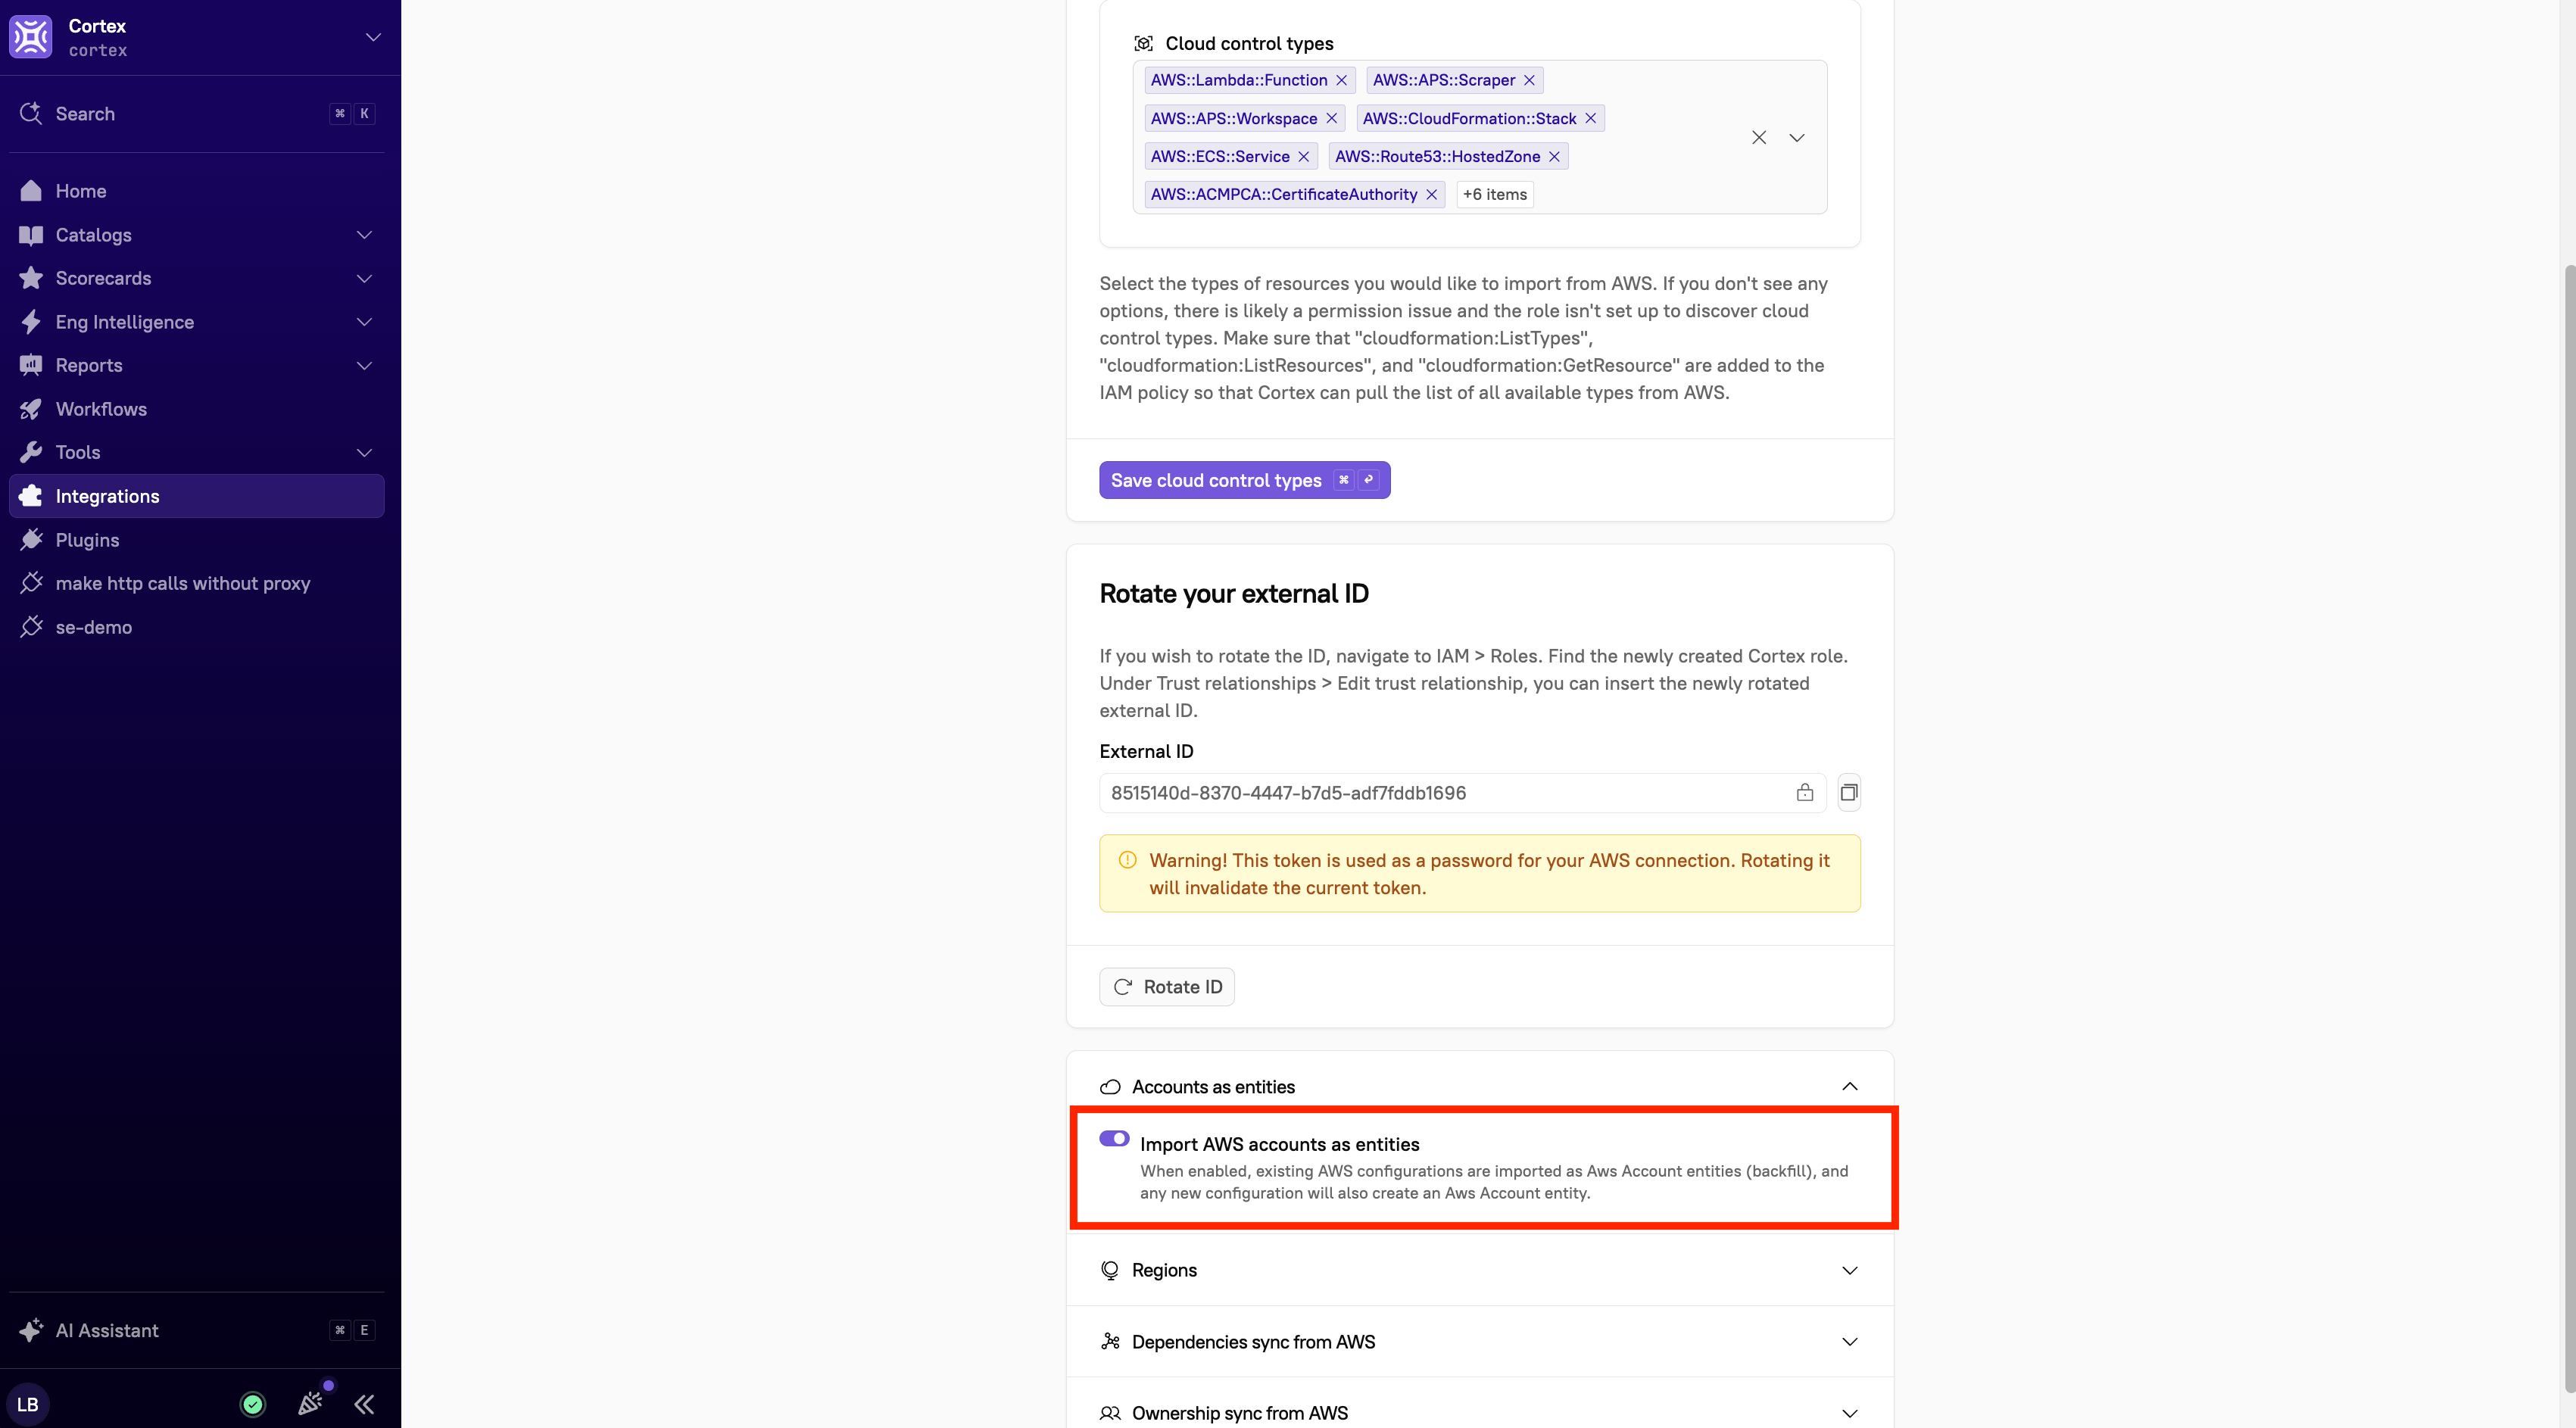
4. Scroll to **Accounts as entities**, then toggle on **Import AWS accounts as entities**.
5. Click **Save dependency tag keys**.
#### **Using key/value pairs in the entity descriptor for dependency discovery**
You can also define explicit tag key/value pairs in the `x-cortex-dependency` block for AWS dependency discovery. Instead of matching on service tags, Cortex matches a service to any AWS resource whose tags match the key/value pairs you define in the service's `x-cortex-dependency` block.
For example, the service below depends on any AWS resource tagged with key `service` and value `checkout-service`, key `team` and value `checkout-team`, or a resource created by the CloudFormation stack `checkout-service-prod`.
```yaml theme={null}
x-cortex-dependency:
aws:
tags:
- key: service
value: checkout-service
- key: team
value: checkout-team
- key: "aws:cloudformation:stack-name"
value: "checkout-service-prod"
- key: "aws:cloudformation:stack-id"
value: "arn:aws:cloudformation:us-west-2:123456789012:stack/checkout-service-prod/1a2b3c4d-5e6f-4a1b-8c9d-0e1f2a3b4c5d"
```
For more information, see the [Dependencies documentation](/ingesting-data-into-cortex/entities-overview/entities/adding-entities/dependencies).
### **Auto-creating AWS account entities**
Users with the `Manage Integrations` permission can configure the auto-creation of AWS account entities.
When enabled, Cortex automatically creates an entity for each AWS account connected to your integration and links it to its AWS resources through a built-in, Cortex-managed relationship.
The **Auto import from AWS, Azure, and/or Google Cloud** setting must be [toggled on](/ingesting-data-into-cortex/integrations/aws/importing-entities-from-aws#automatically-importing-aws-entities) prior to auto-creating AWS account entities.
**To enable AWS account auto-creation:**
1. From the main sidebar, select **Integrations**.
2. Locate AWS, then click **Settings**.
3. Select the **Integration settings** tab.
4. Scroll to **Accounts as entities**, then toggle on **Import AWS accounts as entities**.
 Once enabled:
* Cortex creates an **AWS Account** entity for each account configured in Cortex.
* Each AWS resource is automatically linked to its parent account through a Cortex-managed relationship.
As new accounts are configured and resources are discovered, entities and relationships stay in sync automatically.
**To view your AWS account entities:**
1. From the main sidebar, expand **Catalogs**.
2. Select **All entities**, then select the **Entity types** tab.
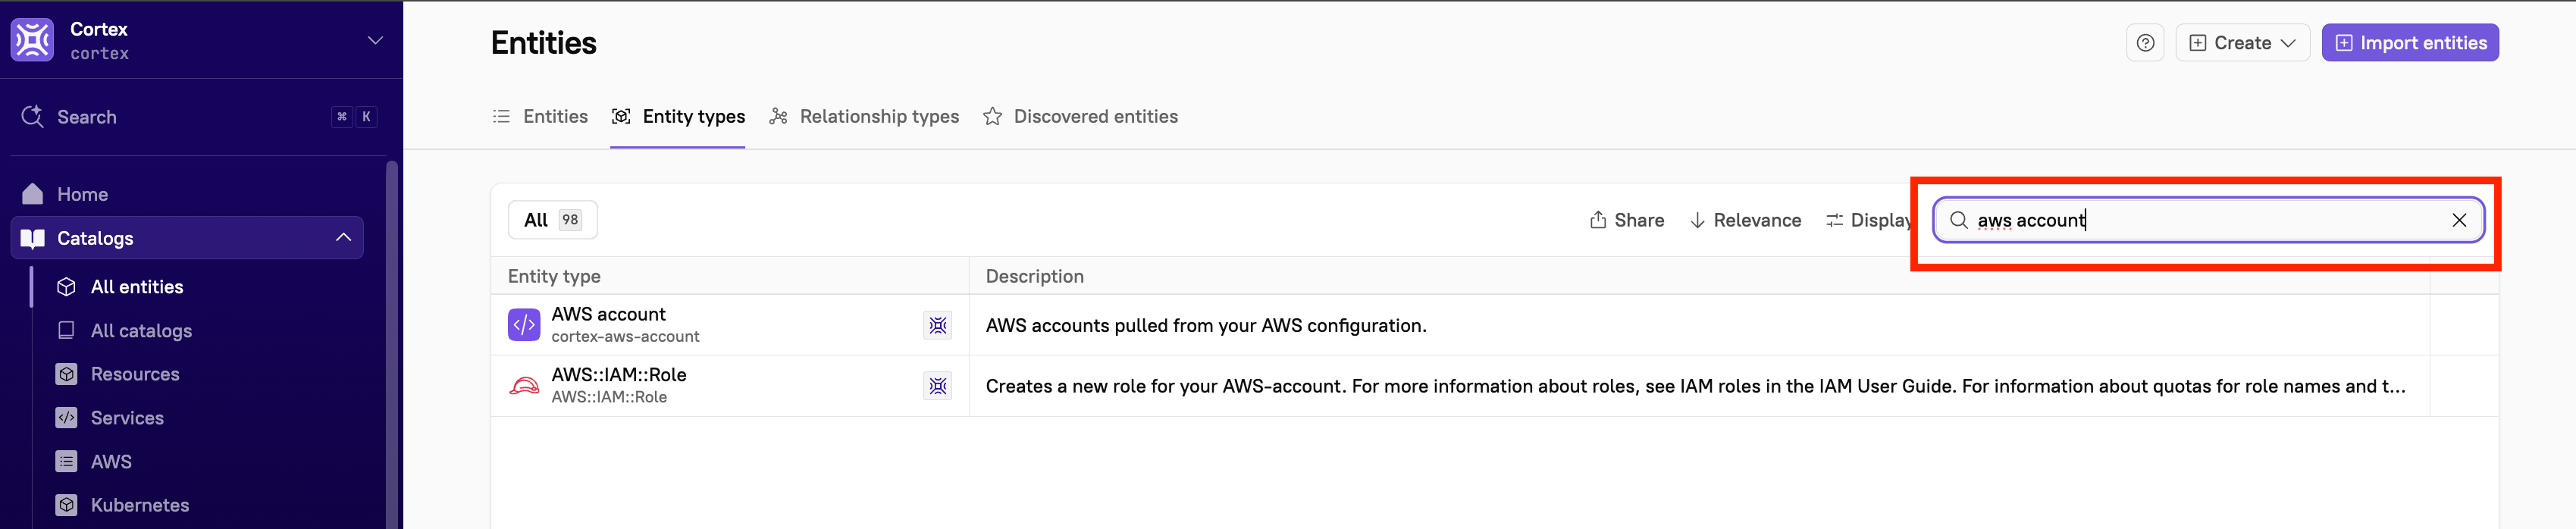
3. Search for **AWS account**.
Once enabled:
* Cortex creates an **AWS Account** entity for each account configured in Cortex.
* Each AWS resource is automatically linked to its parent account through a Cortex-managed relationship.
As new accounts are configured and resources are discovered, entities and relationships stay in sync automatically.
**To view your AWS account entities:**
1. From the main sidebar, expand **Catalogs**.
2. Select **All entities**, then select the **Entity types** tab.
3. Search for **AWS account**.
 4. Select an entity type, then select an entity.
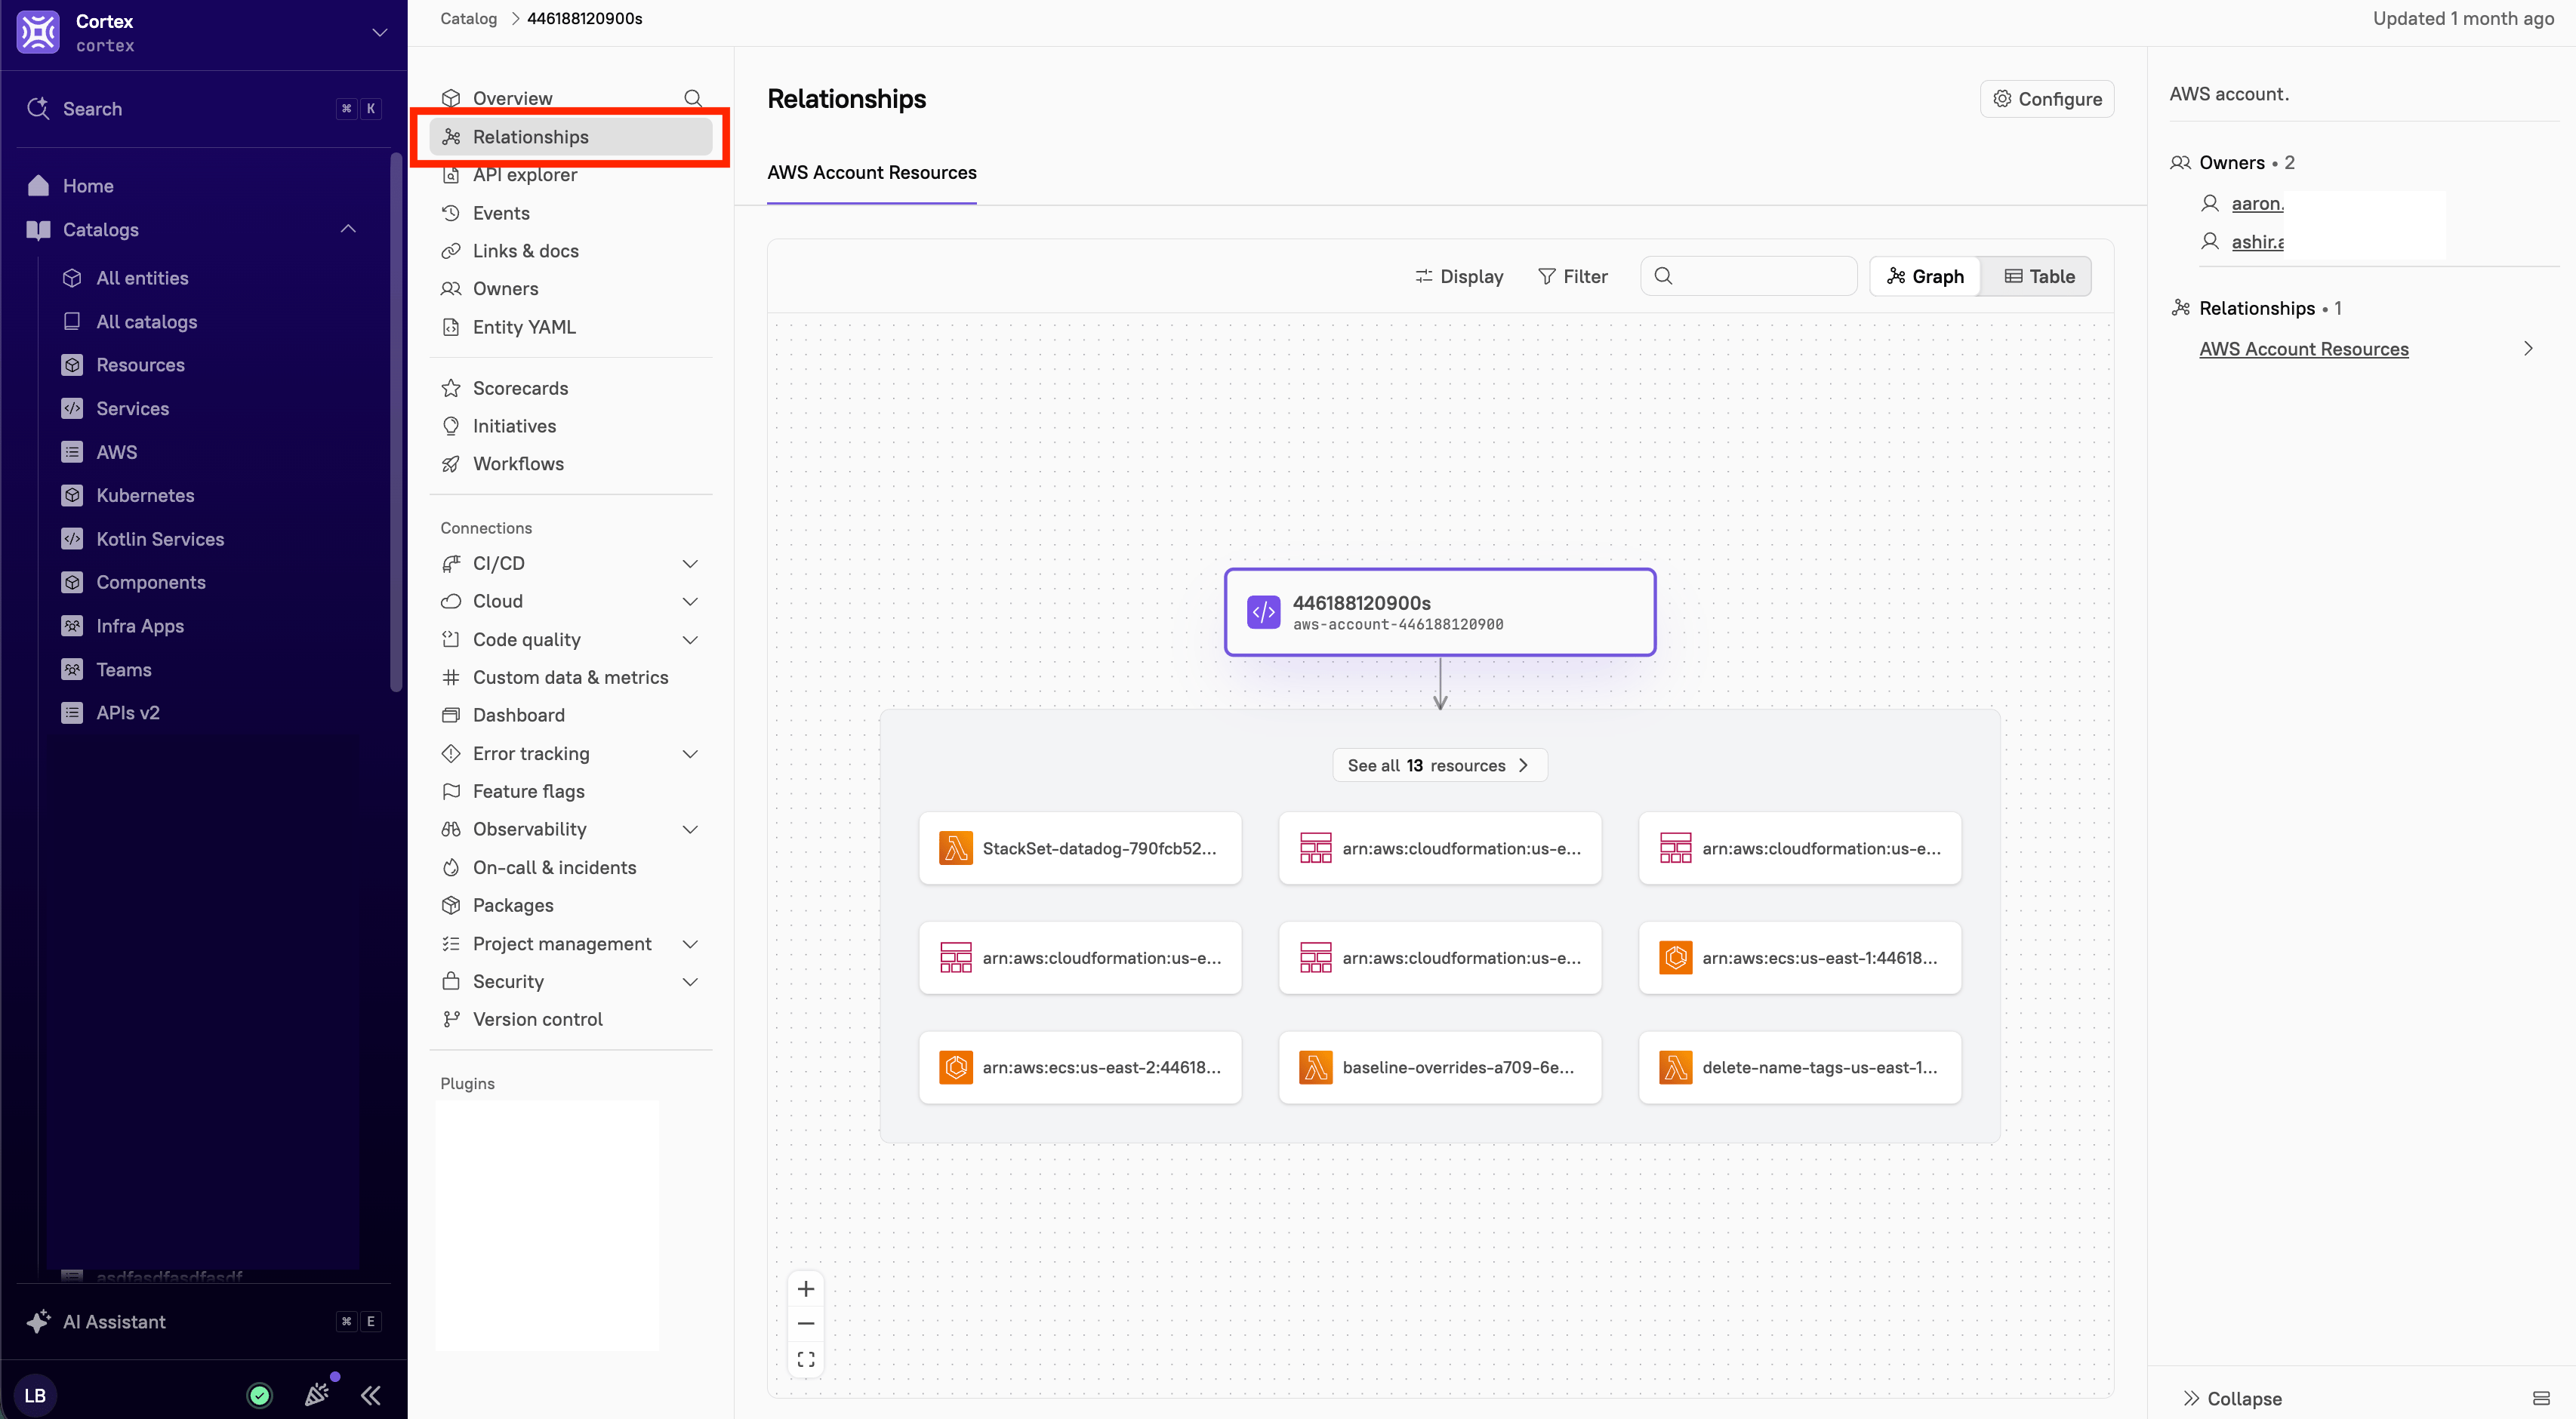
5. From the **Catalog** menu, select the **Relationships** tab.
4. Select an entity type, then select an entity.
5. From the **Catalog** menu, select the **Relationships** tab.
 ### Discovering ownership for AWS
Cortex can automatically discover ownership for your AWS resources. By default, Cortex looks for the `owner` tag, but you can customize the tag key name.
Cortex syncs ownership from AWS daily at 6 a.m. UTC.
1. From the main sidebar, select **Integrations**.
2. Locate AWS, then click **Settings**.
3. Select the **Integration settings** tab.
4. Scroll to **Ownership sync from AWS**, then toggle on **Enable ownership sync**.
### Discovering ownership for AWS
Cortex can automatically discover ownership for your AWS resources. By default, Cortex looks for the `owner` tag, but you can customize the tag key name.
Cortex syncs ownership from AWS daily at 6 a.m. UTC.
1. From the main sidebar, select **Integrations**.
2. Locate AWS, then click **Settings**.
3. Select the **Integration settings** tab.
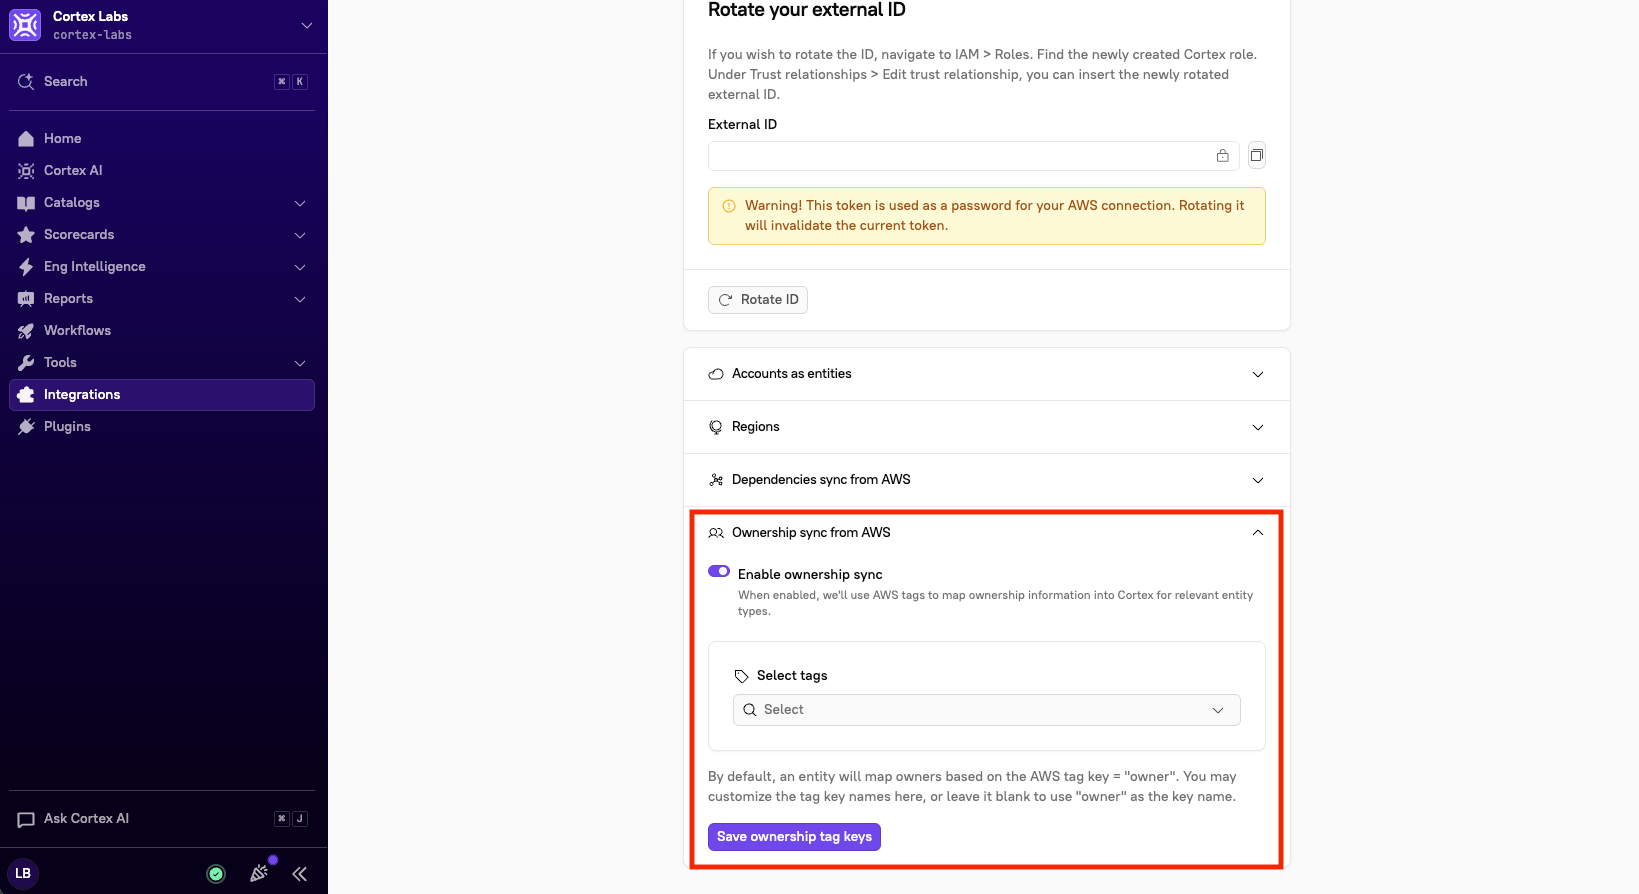
4. Scroll to **Ownership sync from AWS**, then toggle on **Enable ownership sync**.
 5. Optionally, customize the tag key name:
1. From the **Select tags** dropdown, select one or more tags.
2. Click **Save ownership tag keys**.
## Related topics
- [Using the integration for AWS](/ingesting-data-into-cortex/integrations/aws/using-the-integration-for-aws.md)
- [Discovered entities](/ingesting-data-into-cortex/entities-overview/entities/discovery-audit.md)
- [Connecting entities to Google Cloud Platform](/ingesting-data-into-cortex/integrations/google/connecting-entities-to-google-cloud-platform.md)
5. Optionally, customize the tag key name:
1. From the **Select tags** dropdown, select one or more tags.
2. Click **Save ownership tag keys**.
## Related topics
- [Using the integration for AWS](/ingesting-data-into-cortex/integrations/aws/using-the-integration-for-aws.md)
- [Discovered entities](/ingesting-data-into-cortex/entities-overview/entities/discovery-audit.md)
- [Connecting entities to Google Cloud Platform](/ingesting-data-into-cortex/integrations/google/connecting-entities-to-google-cloud-platform.md)